Part 4: Sharing Concepts and How to Begin Sharing
This is the fourth in an eight-part series on implementing data sharing in Shopping UK using CloudKit.
Shopping UK is a smart shopping list for UK shoppers. It knows almost every product in the supermarket and will arrange them by aisle. Lists can be shared with family or friends.
Last week, we looked at the three ways records can be retrieved from iCloud, and how the data can be added and changed. Today, we’ll look at how sharing works and how to initiate the sharing of a list.
Where does the data live?
Before we look at sharing, let’s review how data is segregated in iCloud.
Every iCloud account sees three separate CKDatabases:
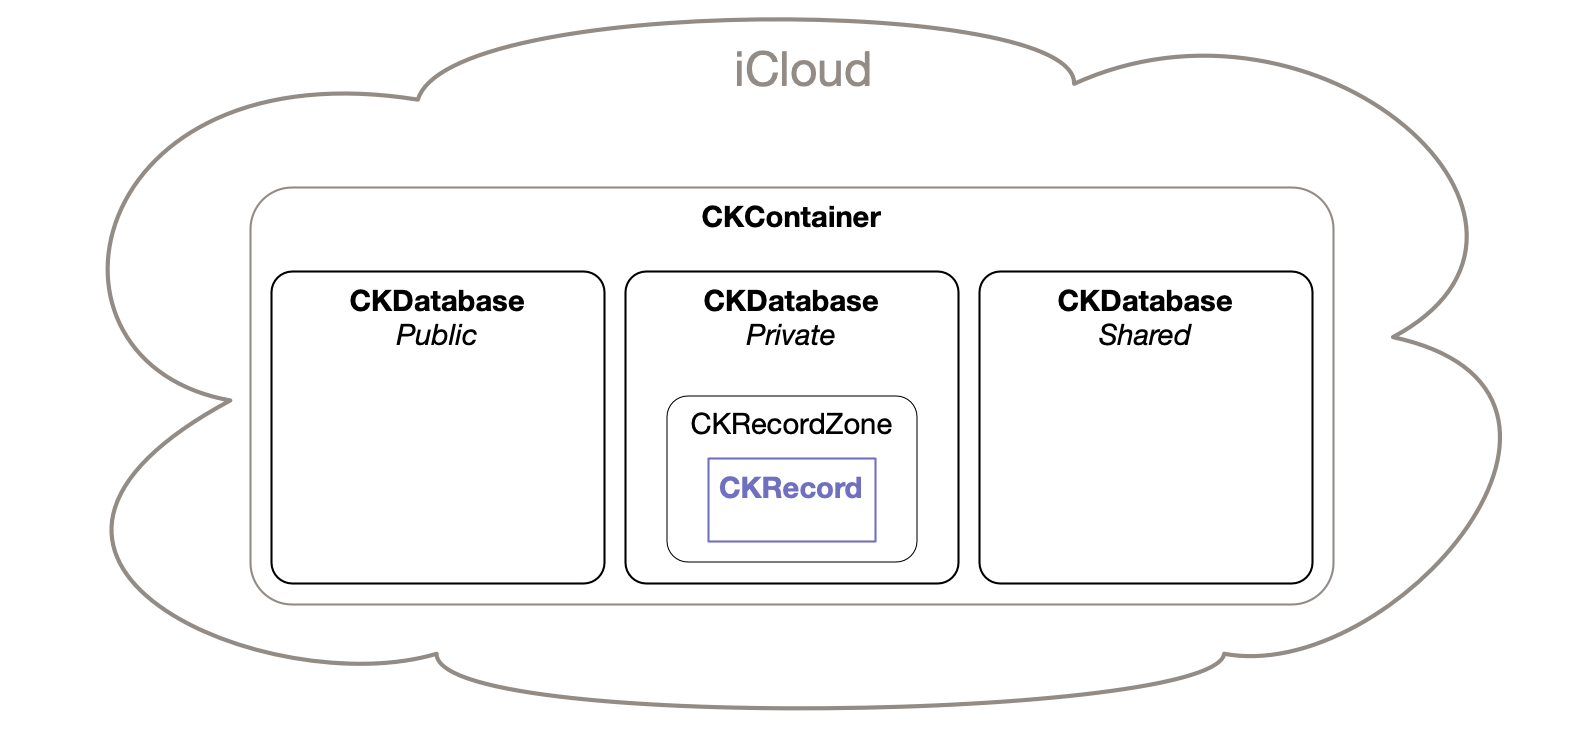
When the app sends a CKModifyRecordsOperation to iCloud to add data, it chooses which of the three CKDatabases to use.
Public and Private databases are easy to understand:
-
Data added to Public can be viewed or modified by anyone (access can be restricted to only users signed into iCloud, or made read-only for everyone except the creator)
-
Data added to Private can only be seen and changed by the iCloud account holder. No-one else, not even app developers like me, can see your Private database.
The Shared database is more interesting because it doesn’t really contain data. It simply exposes it. Think of it like a database view.
What happens when a list is shared?
There are three key activities involved in sharing a list:
- Preparing the data to be shared. For Shopping UK, the data includes the list’s items (e.g. “bread”, “milk”) and the attributes of the list itself (name, colour). The list will already exist on the “owner’s” device, but it must be uploaded to iCloud before it is available for other people.
- Sending the sharing invitation. The invitation will be sent from the owner’s device to other people who will become “participants” in the share.
- Accepting the invite. The other participants must open and explicitly accept the share before data can be exchanged.
Once setup, all changes to the shared list will be synchronised between devices.
Next week, in part 5, we’ll see how a sharing invitation is accepted. Later, in part 6, we’ll look at how data is synchronised between devices.
Today, we’ll look at the first two activities: preparing the data and sending the invite.
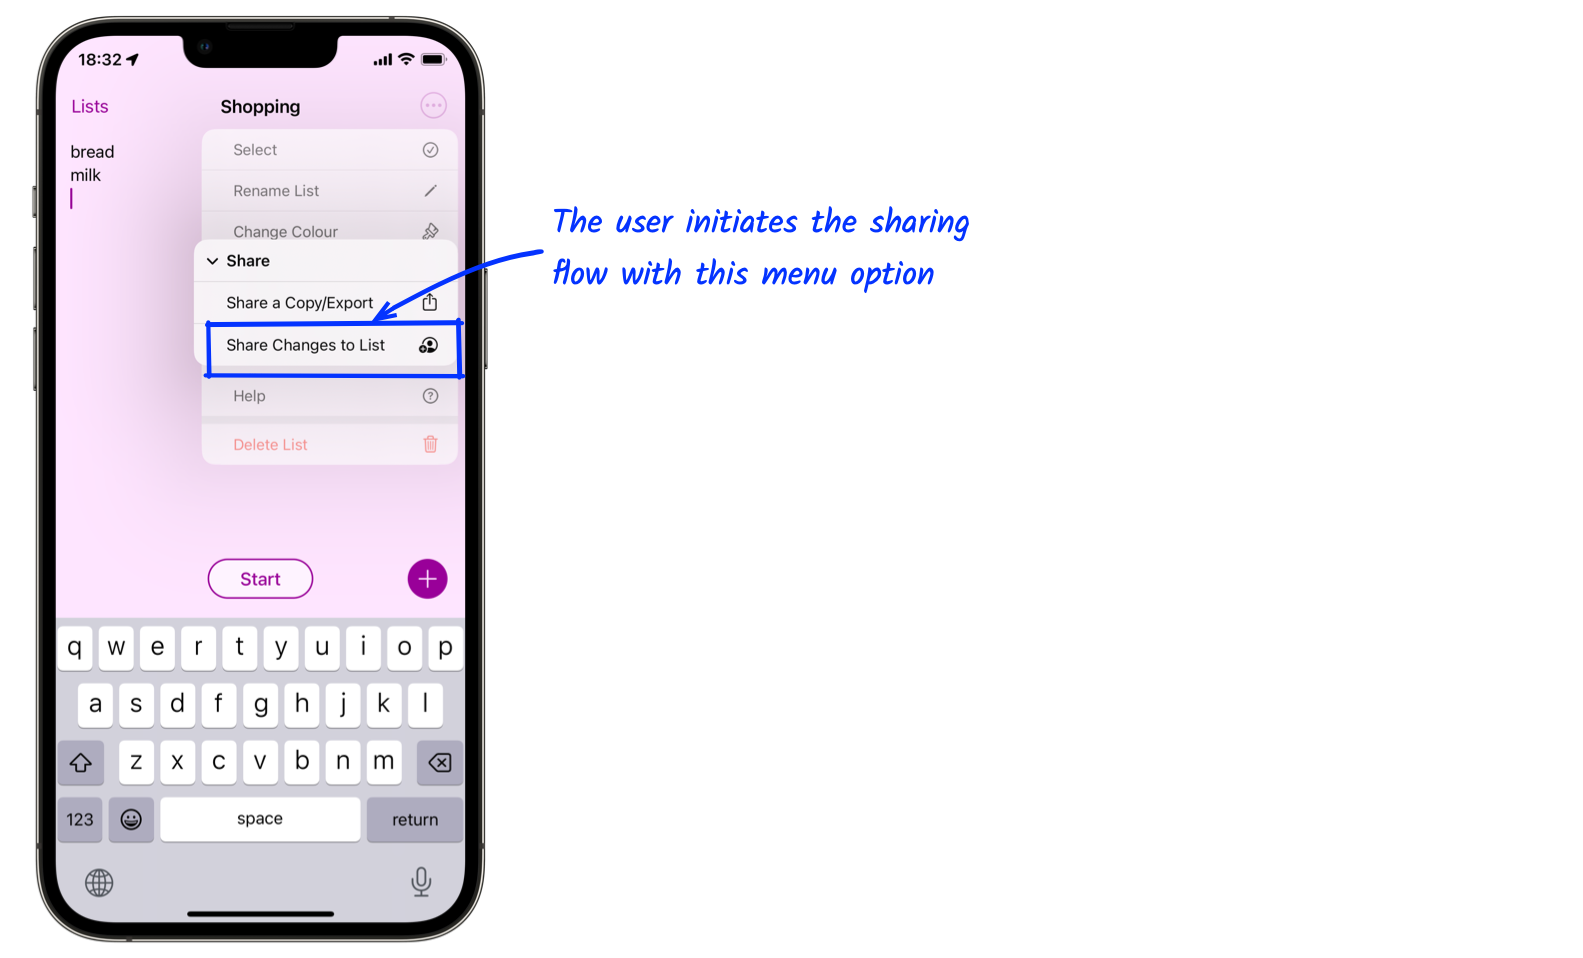
Step 1: User requests the list to be shared
List sharing begins when the user chooses the “Share Changes to List” option from the menu:
Step 2: The app checks the iCloud account and list state
Before data is exchanged, the app checks:
- An iCloud account is available.
- The list is not already being shared.
A message will be shown if either check fails.
The iCloud status is checked using accountStatusWithCompletionHandler available on the CKContainer.
The app knows the list is shared if a ShareId is set in the locally cached list record on the device. Later, we’ll see how this is set.
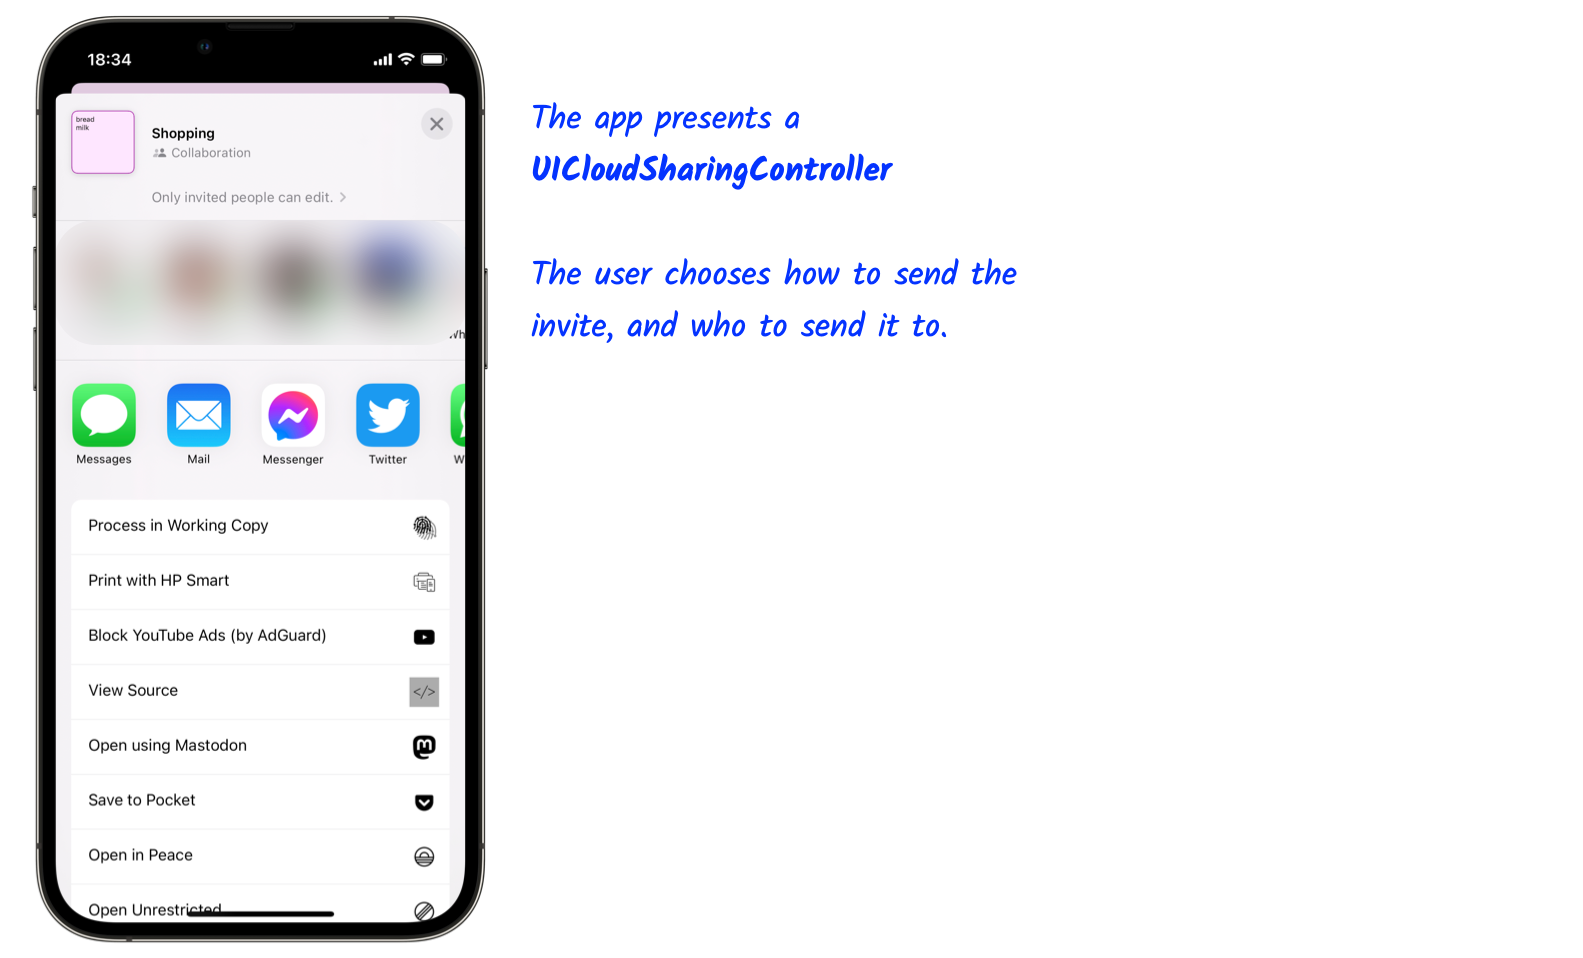
Step 3: The app creates a controller for managing the sharing activity
The app creates a UICloudSharingController to manage the interaction with the user. It is possible to manage the interaction with custom code but the UICloudSharingController’s user interface is familiar, widely used in Apple’s own apps, and it works well.
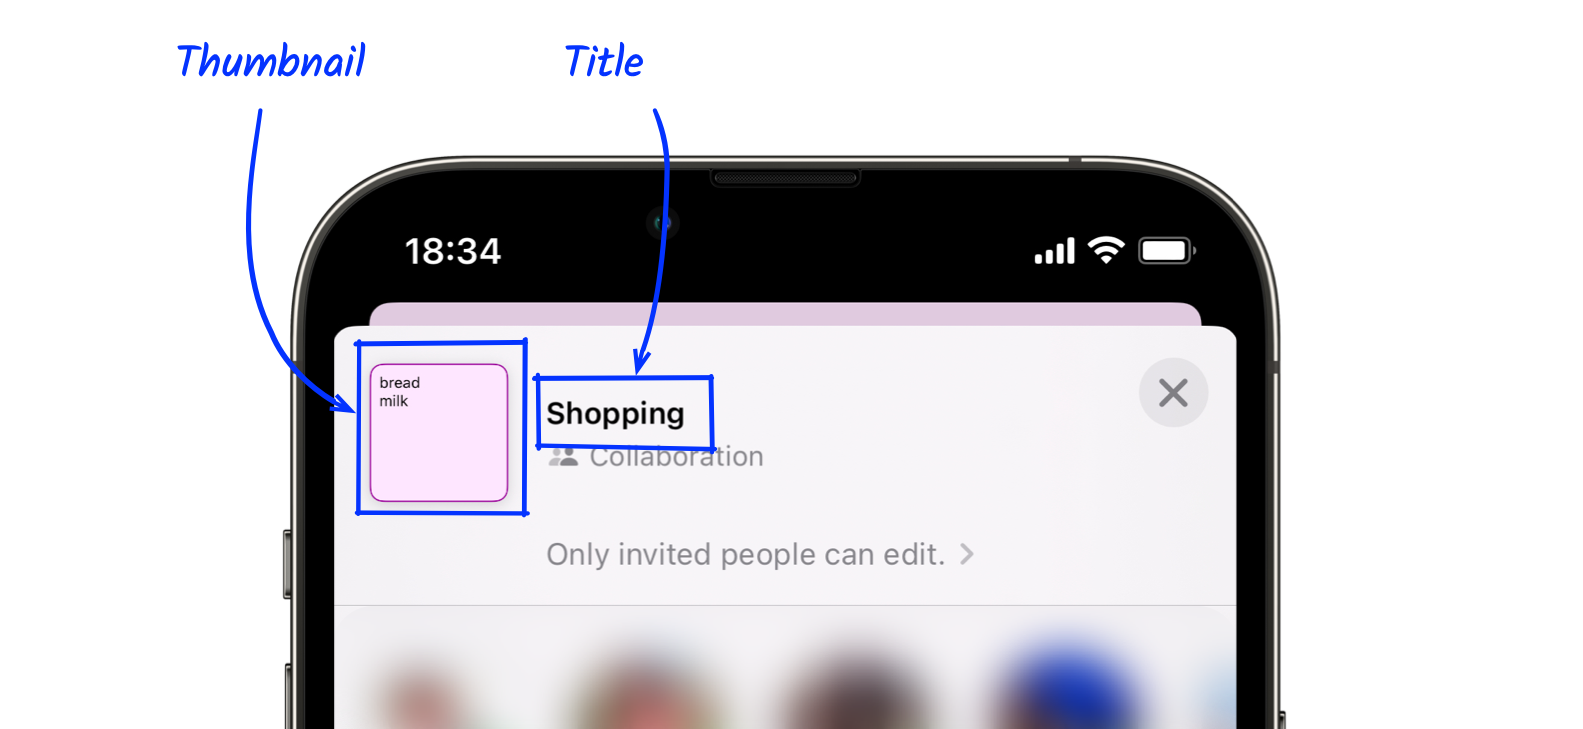
A UICloudSharingControllerDelegate is used with the UICloudSharingController to provide a title and thumbnail image . These are shown in the top-left of the sharing sheet and in the invitation message we’ll see in Step 6.
Step 4: PreparationHandler
The PreparationHandler is called when the user selects the method for sending data (e.g. Message, Email, AirDrop, WhatsApp).
The PreparationHandler is responsible for adding the shared records to iCloud.
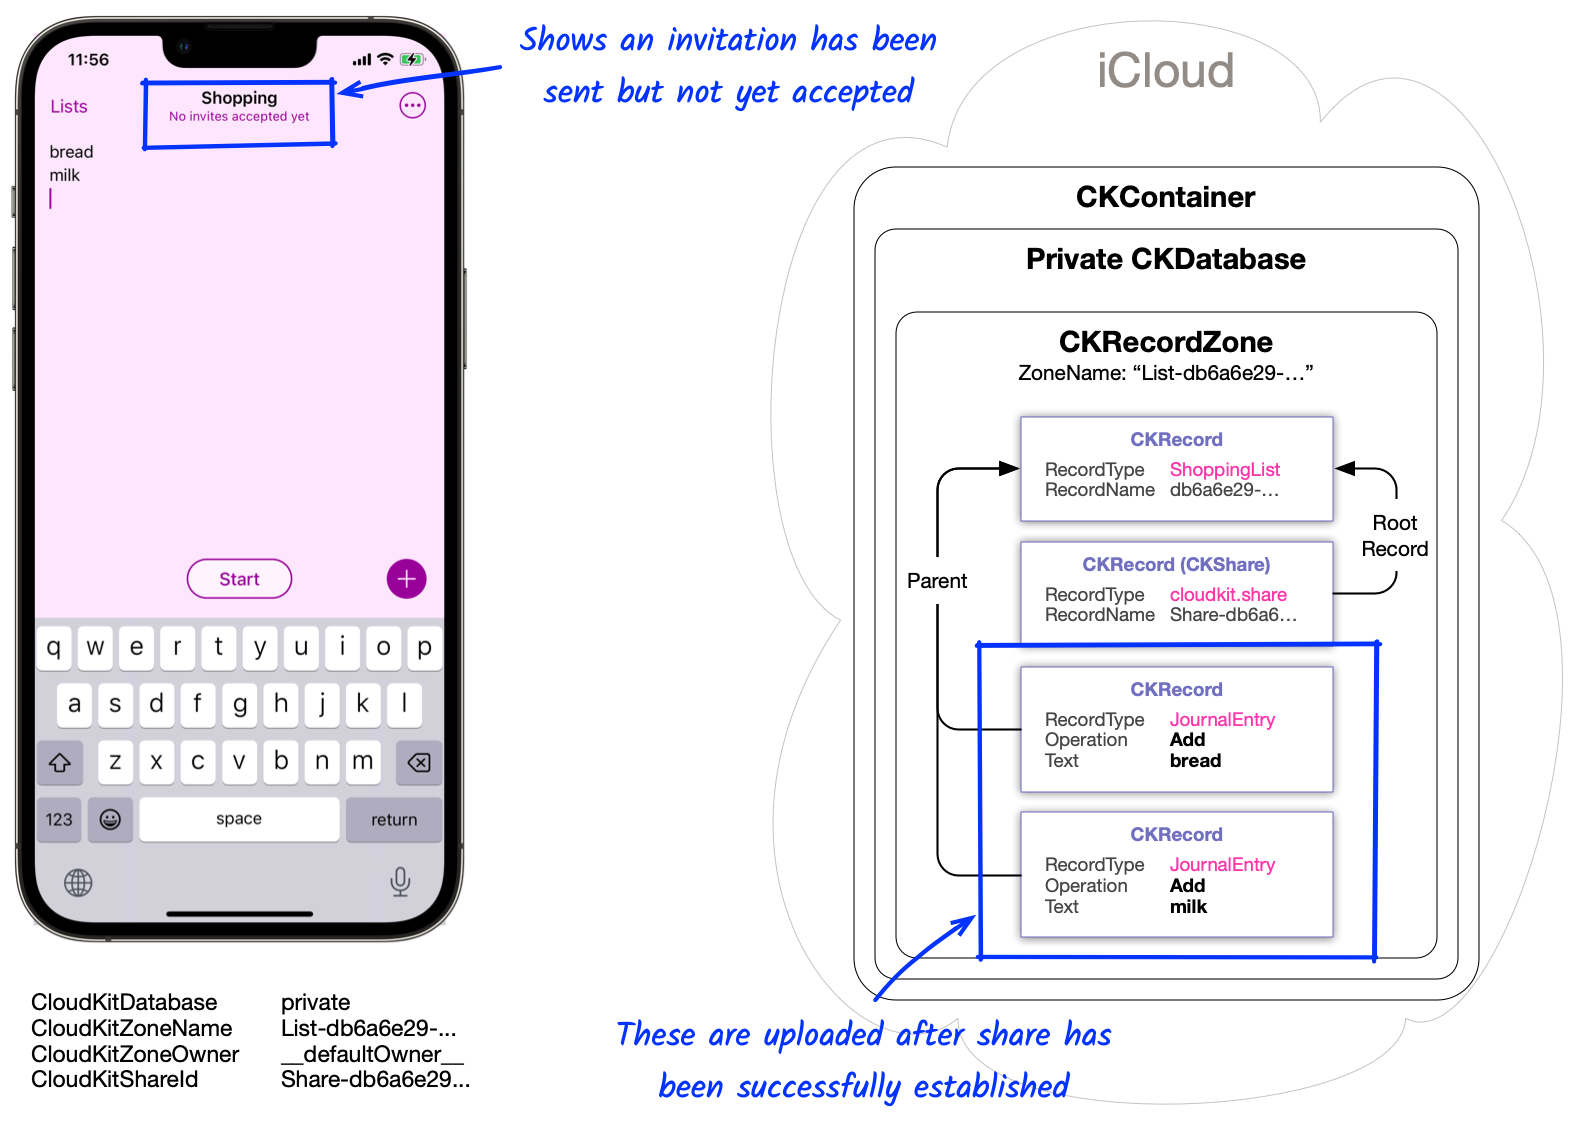
Shopping UK first creates a new CKRecordZone in the Private database using SaveRecordZone.
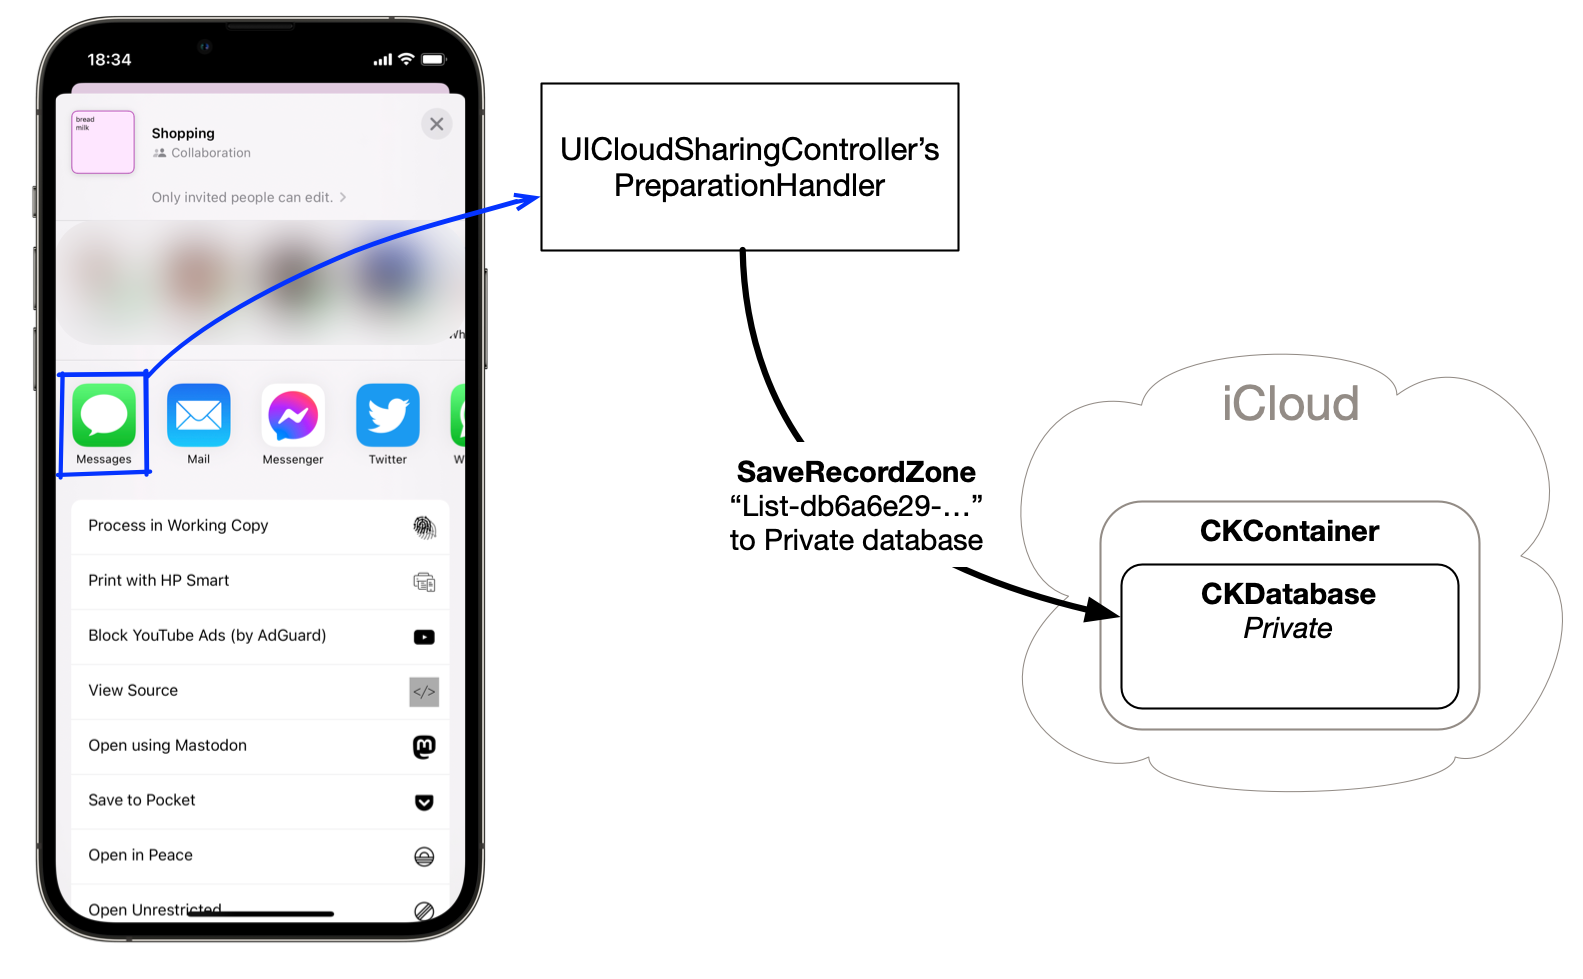
The new CKRecordZone name is derived from the identity of the list (e.g. “List-db6a6e29-…”).

By placing all records for a shopping list in a dedicated CKRecordZone , it will be easier to delete the data atomically. We’ll revisit this later, in part 7, when we explore what happens when the user stops sharing a list or signs out of iCloud.
Next, the CKRecordZone will be populated with the records that represent the list.
Step 5: Upload Records
After the CKRecordZone has been successfully created, the app issues a CKModifyRecordsOperation to CloudKit:
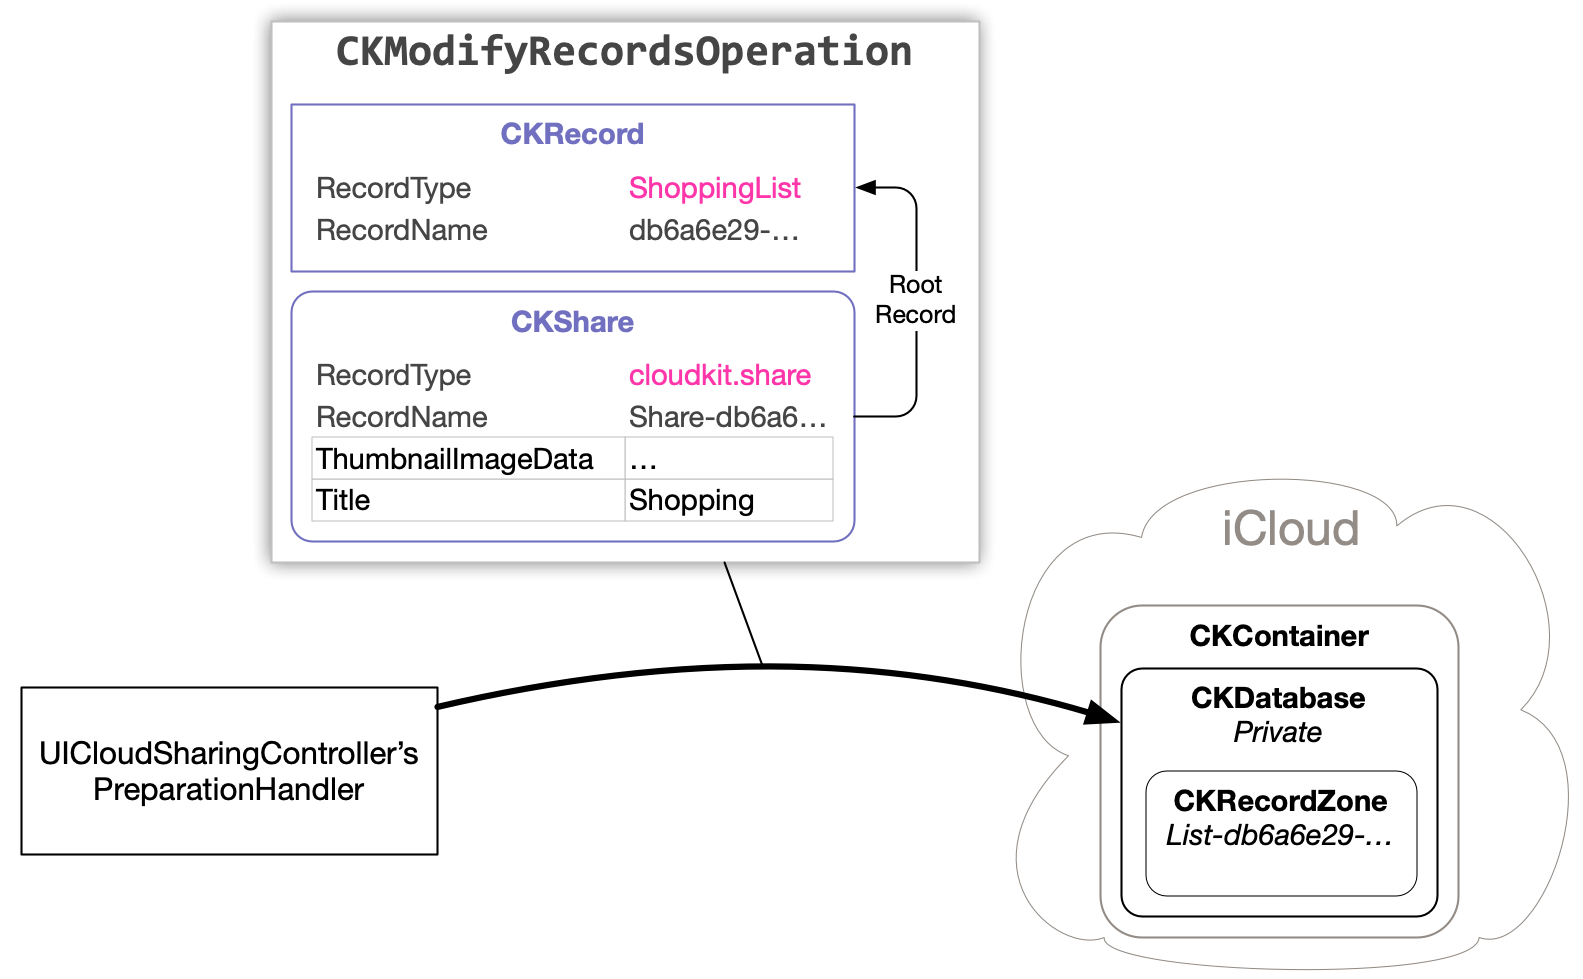
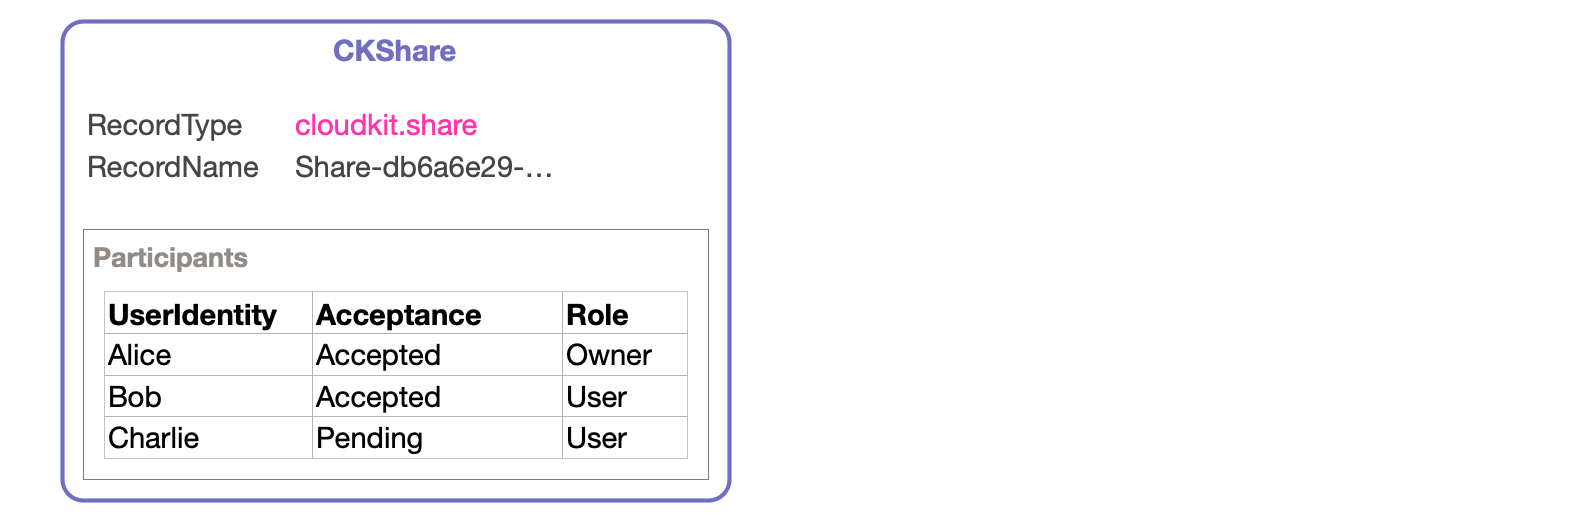
Only two CKRecords are included in the upload message:
-
A ShoppingList CKRecord. This represents the shopping list itself, but it doesn’t contain any information about the list’s Name, Colour, or Items. These will be sent later as JournalEntry CKRecords
-
A CKShare. This is a special type of CKRecord (Record Type: cloudkit.share), which identifies the CKRecords to expose.
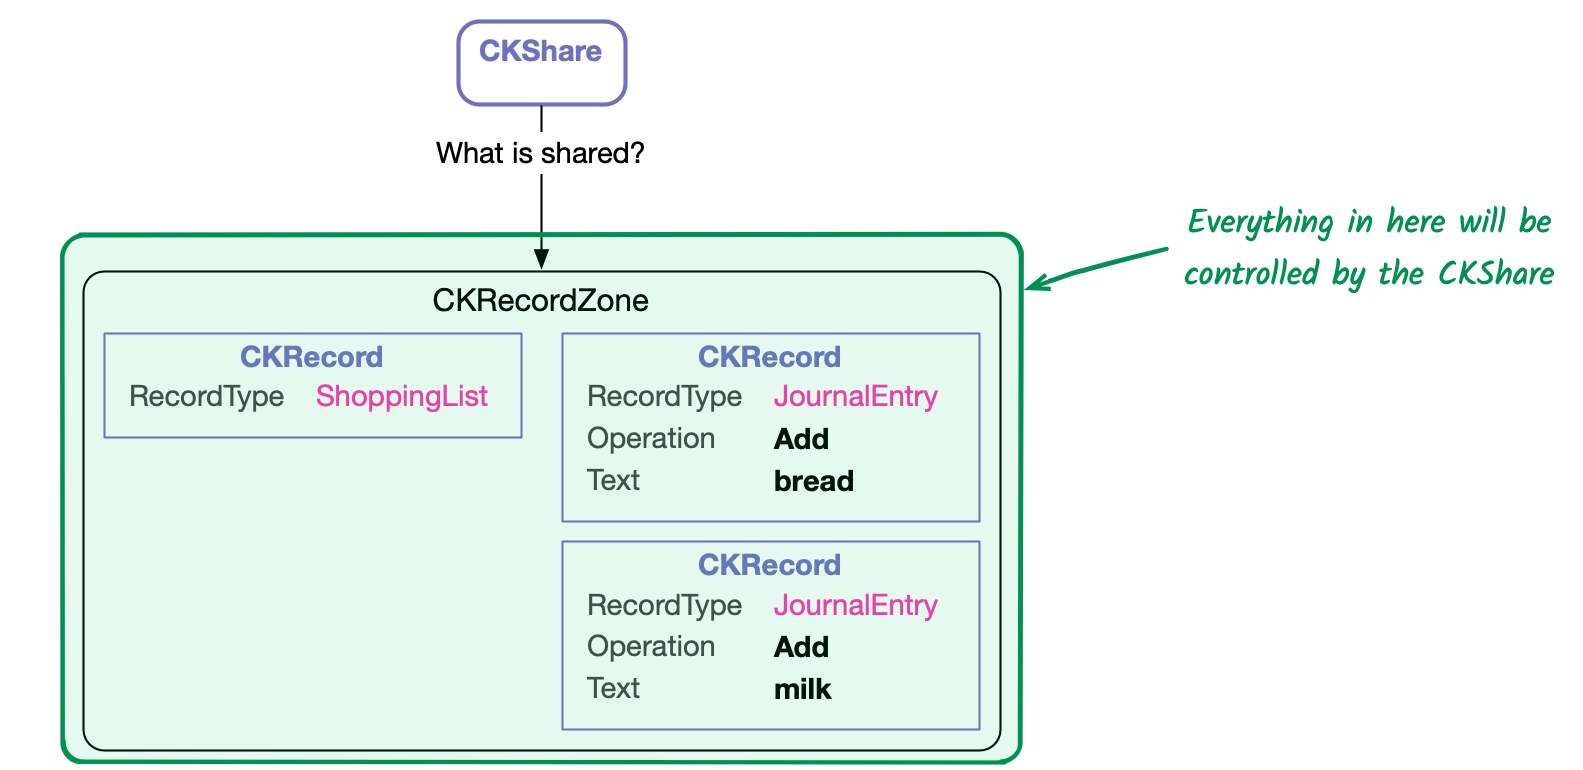
The CKShare acts as a window through which other share participants can view the shared records. There are two ways to use it:
- Share a CKRecordZone
- Share a root CKRecord (and its children)
Option 1: Share a CKRecordZone
If the CKShare is created with a CKRecordZone, the zone and its contents will all be shared.
Option 2: Share a root CKRecord (and its children)
If the CKShare is created using a CKRecord, this root record and its children (and its children’s children, etc. — all the way to the bottom of the hierarchy) will be shared.
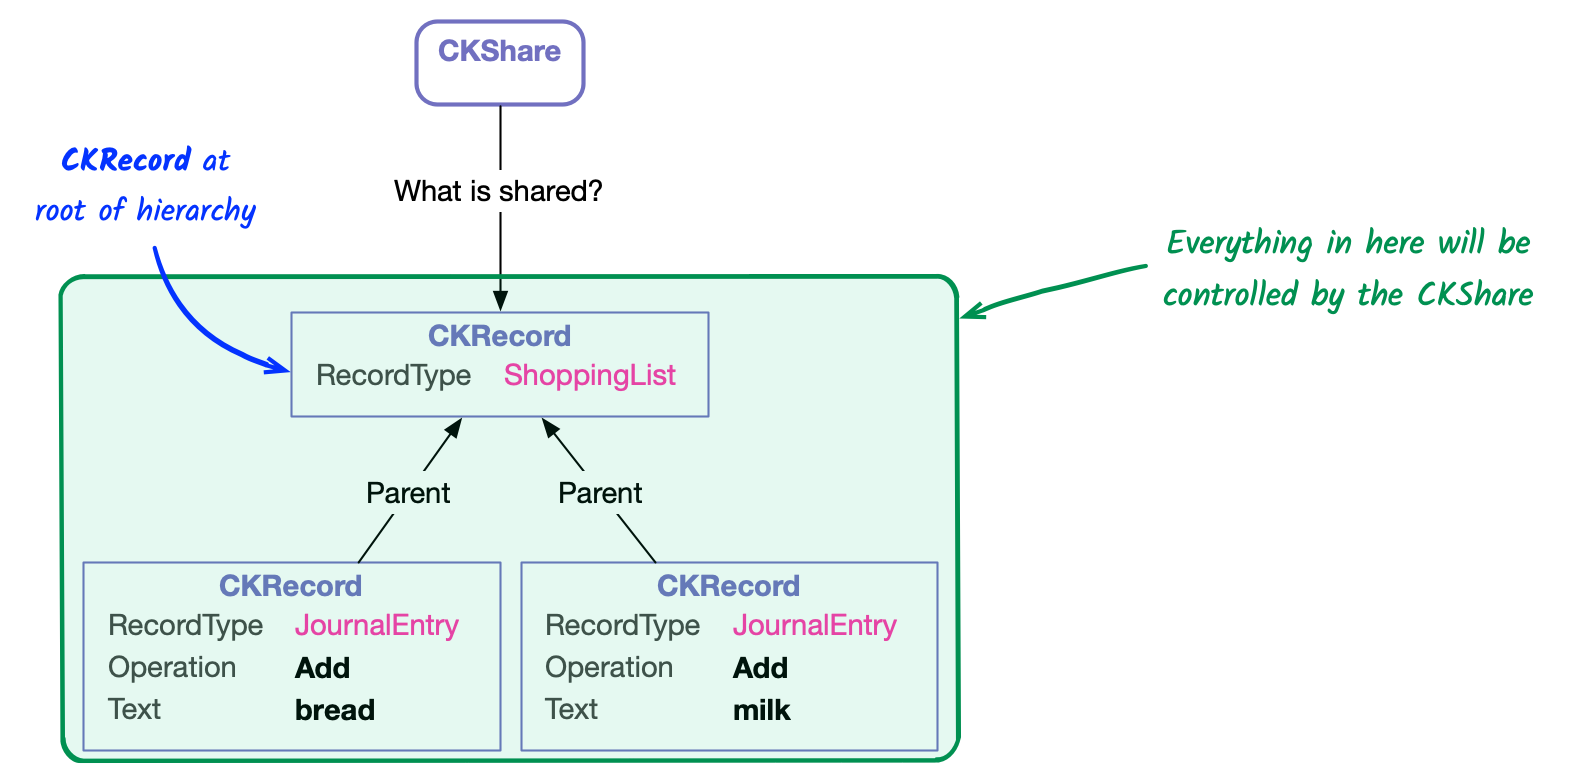
In Shopping UK, there is a dedicated CKRecordZone for every shopping list, which means both options are available. But I chose to share via a root record (Option 2) rather than by zone (Option 1) because I thought it may be useful in the future to have records present in the zone that are not part of the share.
As well as defining the scope of visibility, the CKShare is also responsible for recording the owner of the shared records and the acceptance status of all participants. The “Owner” is the iCloud account of the person who initiated the share.
What happens to the list’s items?
So far, we’ve uploaded a list placeholder CKRecord and the CKShare record, but we haven’t uploaded the most important bit — the contents of the list — “bread” and “milk”.
I excluded the list’s items from the initial payload because I encountered problems when sharing very large lists (with several hundred items).
I discovered the upload would take a long time and trigger a timeout. No error was reported but the UICloudSharingController would give up without creating the share. This could be reproduced consistently, and the controller would close after about 10 seconds.
To fix this, I changed strategy to avoid uploading the items upfront. Instead, the items are now added to an internal upload queue, which is processed after sharing has completed (as part of Step 7 below).
This has a nice consequence — simpler logic. The logic to upload list items after the share has been initialised is now the same as the logic to upload list items during normal synchronisation (which will be discussed later, in part 6).
Once the data has uploaded, the app calls the PreparationHandler’s completion block to tell the UICloudSharingController to continue with the invitation workflow.
Step 6: Sending the invitation
After the PreparationHandler’s completion block has receives the success message from the app, it launches the chosen method of sharing (e.g. Messages)
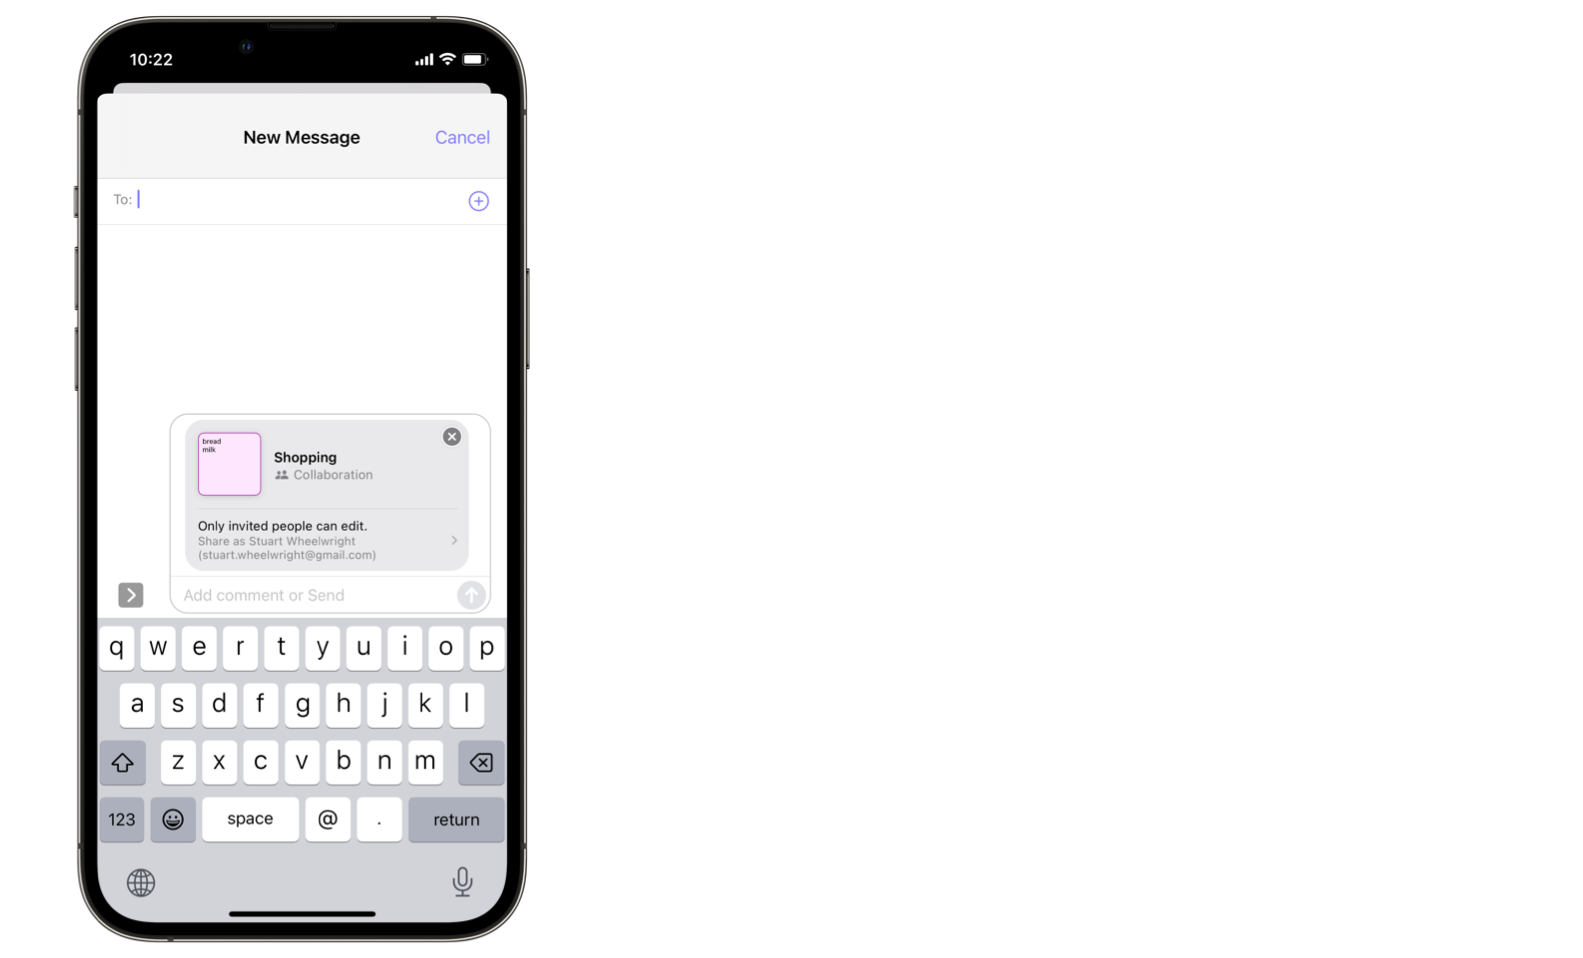
The user will choose the message’s recipients in the usual way, add additional message contents if they choose, and hit the “Send” button.
Step 7: Finishing up
Once the invitation message has been sent, the controller calls the delegate’s cloudSharingControllerDidSaveShare method.
Note: I found the cloudSharingControllerDidSaveShare method was sometimes called more than once. This seems to happen when sharing is initiated multiple times in the same session, as if the event handler is being wired-up multiple times and never released. I don’t know if this is something I have done wrong, or a bug in the framework (it’s most likely to be something I’ve done), but I had to work around this by ensuring all operations are idempotent.
Now the data is safely in iCloud, the next task is for the app to link the on-device list to the list in iCloud.
The iCloud information can be read from the UICloudSharingController’s Share property, which contains the new CKShare created in step 5.
The following properties are sufficient to locate the iCloud data:
CloudKitDatabase  = "private"
CloudKitZoneName  = share.Id.ZoneId.ZoneName
CloudKitZoneOwner = share.Id.ZoneId.OwnerName
CloudKitShareId   = share.Id.RecordName
Finally, the user interface is refreshed so the user knows the list is being shared. The app also triggers an upload of the JournalEntry items (“bread”, “milk”) from the internal upload queue (as described in step 5).
Now sharing is complete:
Next week, we’ll see what happens on the other side, when another device accepts the share.
If you get a chance, please try Shopping UK and let me know what you think at @wheelies
