Part 6: Synchronising Data
This is the sixth in an eight-part series on implementing data sharing in Shopping UK using CloudKit.
Shopping UK is a smart shopping list for UK shoppers. It knows almost every product in the supermarket and will arrange them by aisle. Lists can be shared with family or friends.
Last week, we looked at what happens when another device accepts an invitation to collaborate on a shared list. Today, we’ll look at how data is synchronised between devices and some of the challenges to consider.
What is Synchronised?
In Shopping UK, we need to synchronise data from two Record Types:
- cloudkit.share
This tells us who joined or left the shared list - JournalEntry
This contains all changes made to the shopping list
Here’s how they are related:
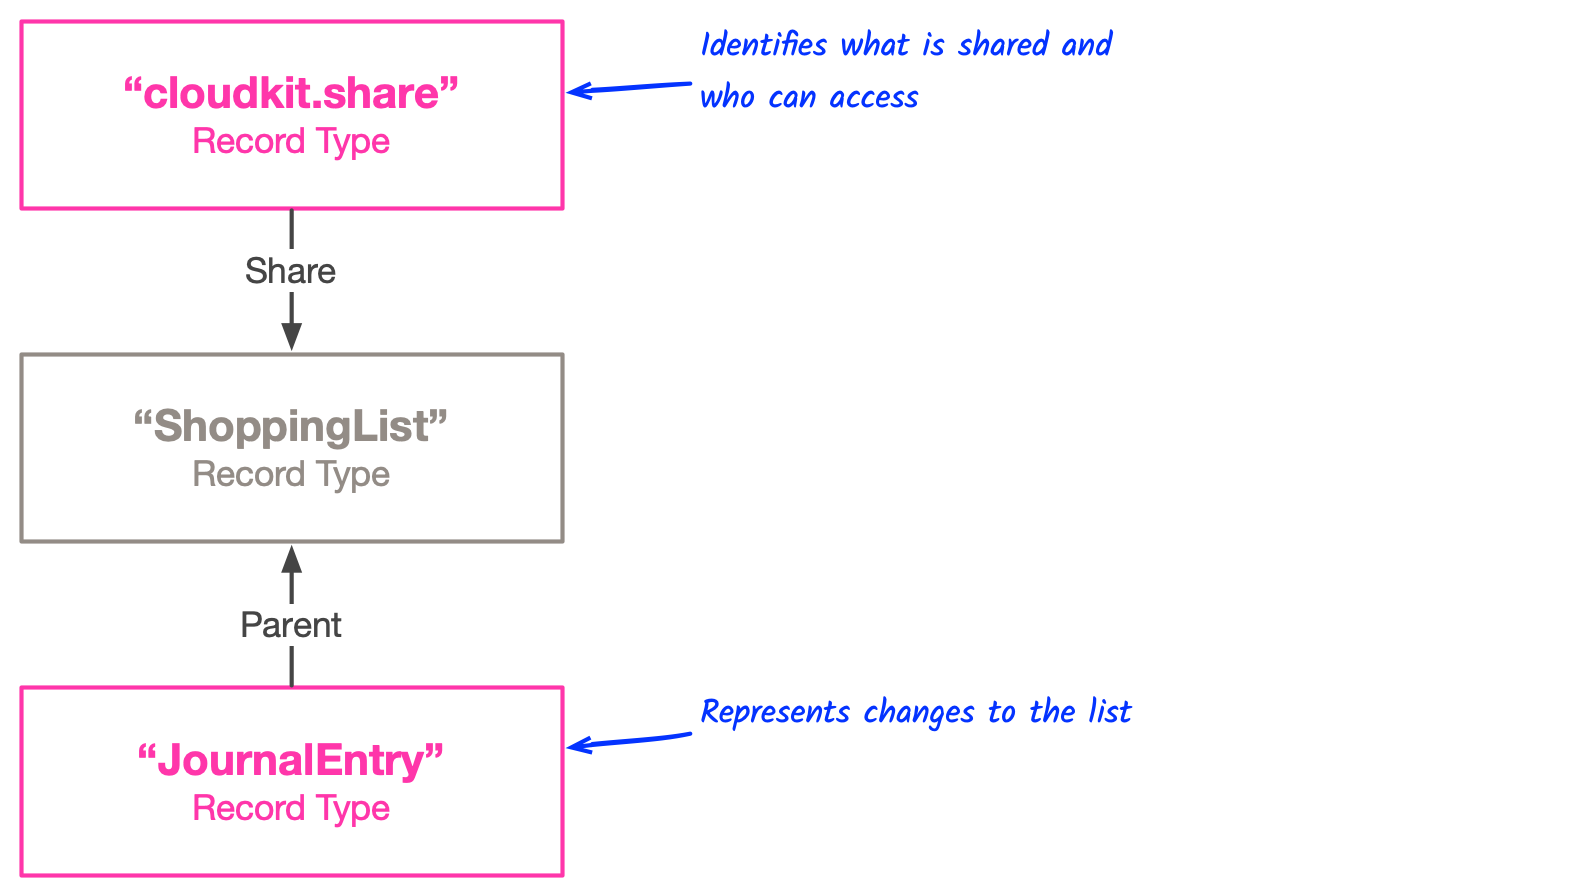
ShoppingList represents the list itself but from a synchronisation perspective, it is very dull. cloudkit.share and JournalEntry are where the action happens.
What is special about cloudkit.share?
Cloudkit.share is a built-in CloudKit Record Type It represents a CKShare object. It’s interesting because it contains a list of who has accepted the share.
The app doesn’t manage the list of participants directly (this is the job of UICloudSharingController (see Part 4 and Part 5 for details).
However, the app is interested in tracking when a participant joins or leaves the list so it can update the Activity view:
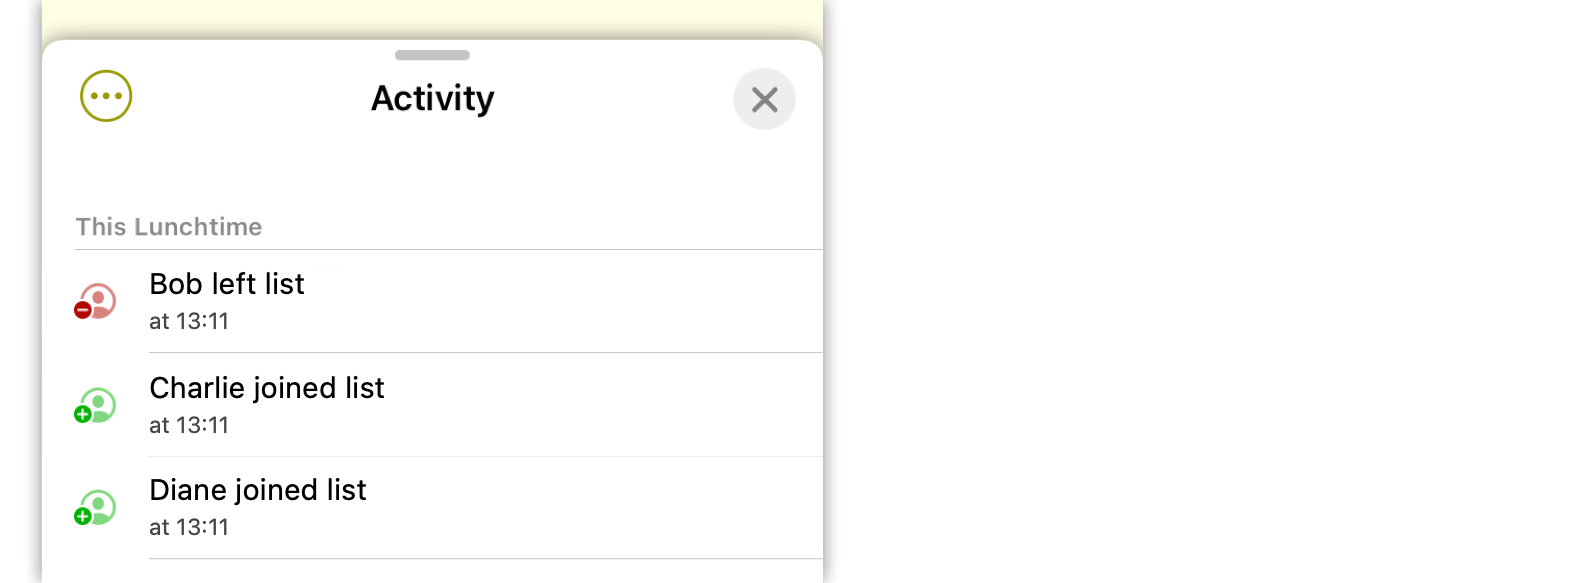
Whenever a change is detected in a cloudkit.share CKRecord, the app compares the share’s participants list with the previously cached list to identify what has changed:
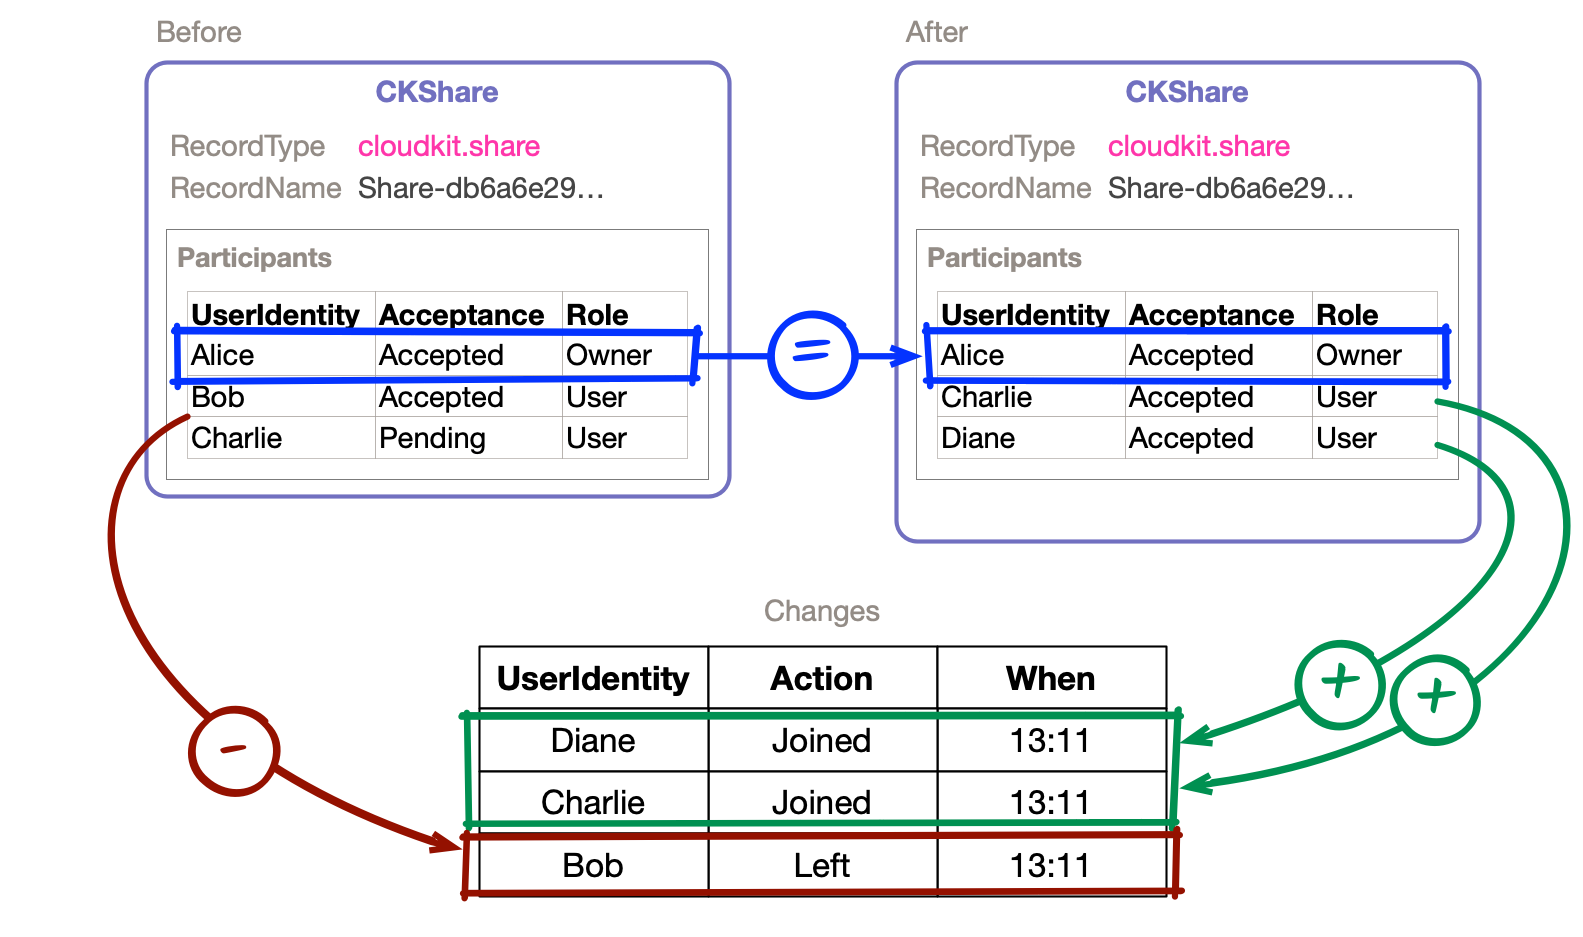
In this example, Charlie and Diane joined the list and Bob left.
This list of participant changes is used to populate the Activity list.
What is special about JournalEntry?
For sharing purposes, every list is represented as a set of JournalEntry records, as discussed in Part 2. JournalEntry can be used to represent every type of change made to a list, and the full list of JournalEntry records is enough to reconstruct the entire list from scratch.
For example, this list:
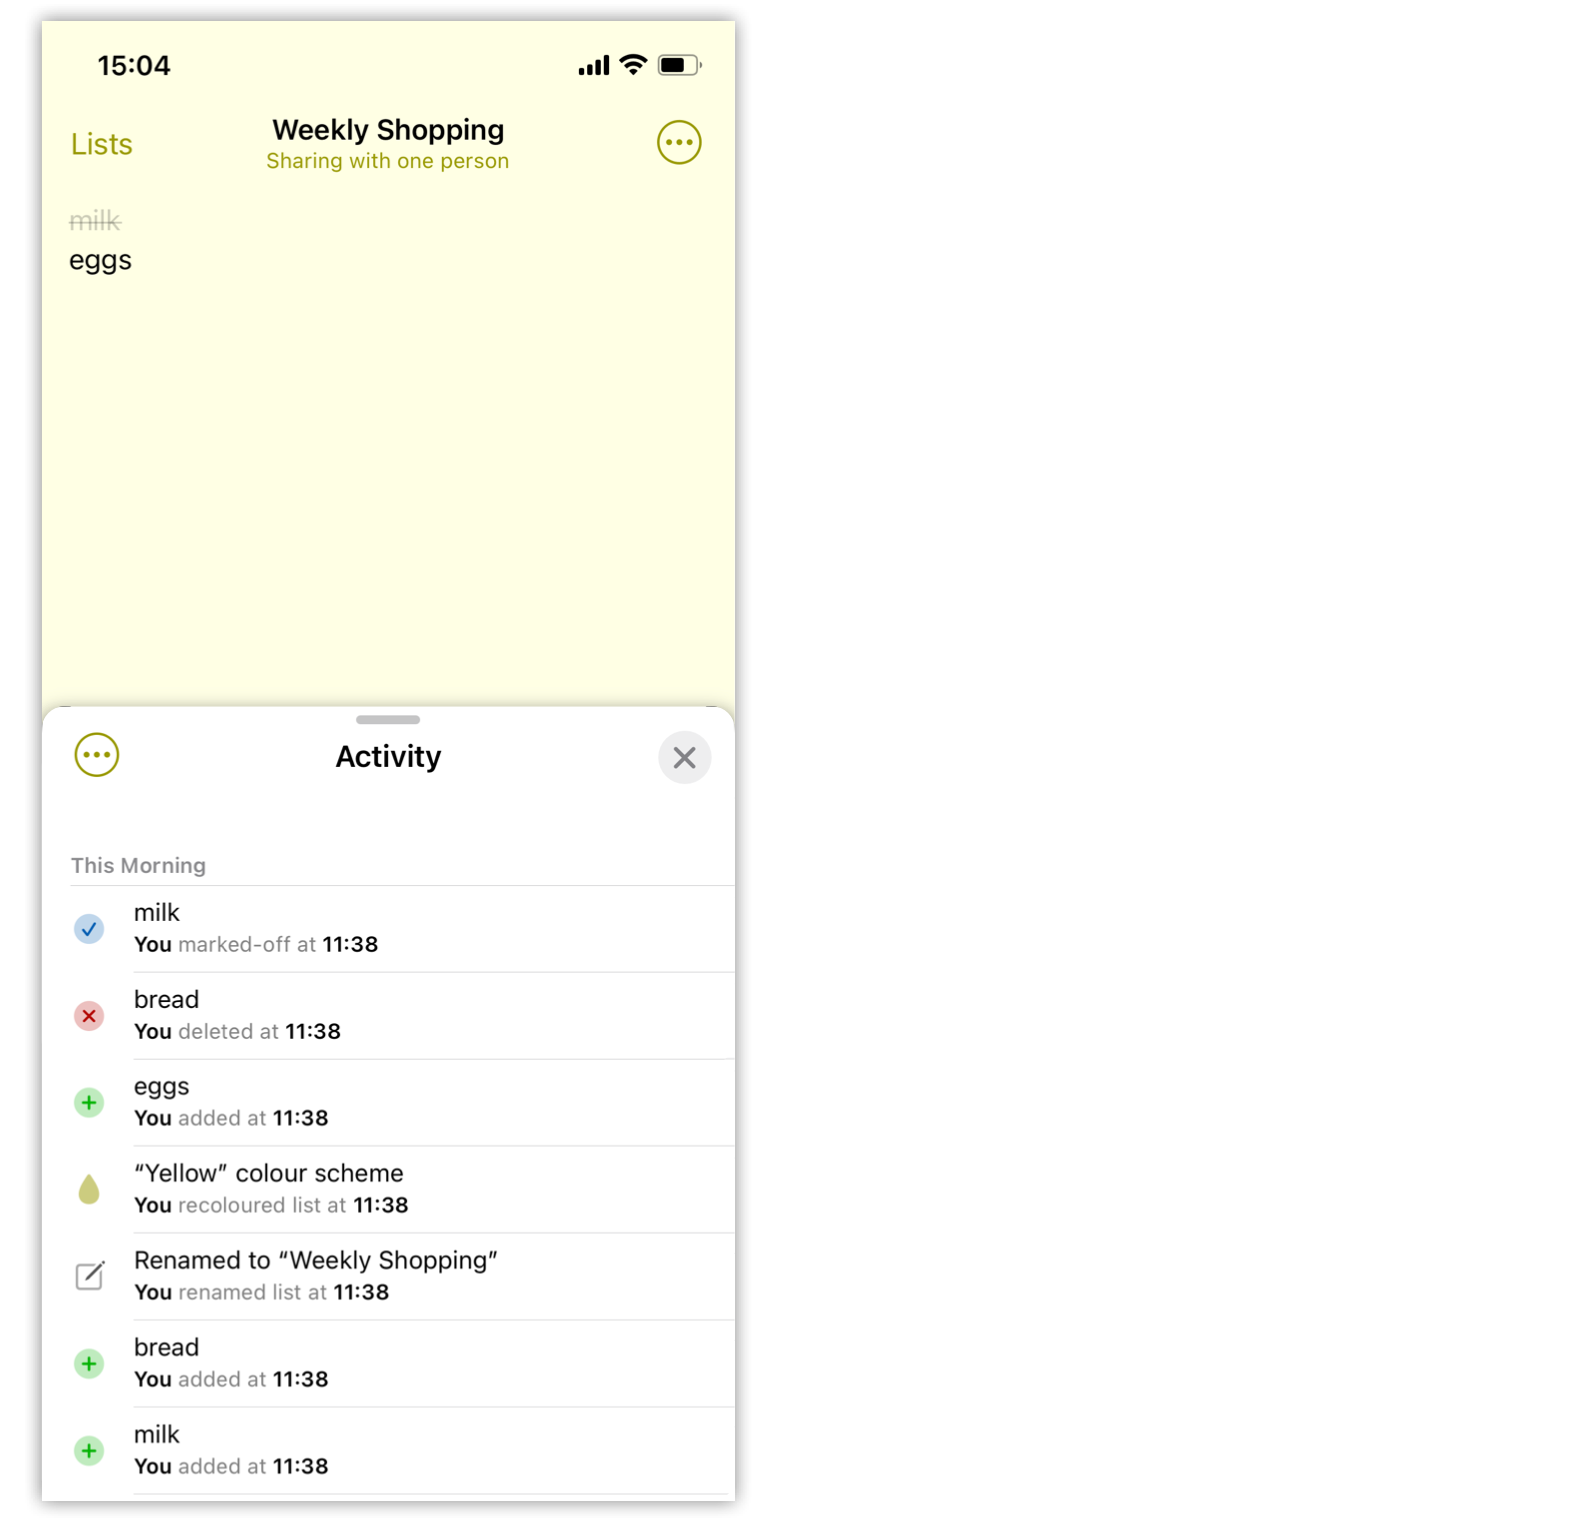
Is represented as seven JournalEntry CKRecords (newest entry at the top):
| Sequence | ItemId | Operation | Text |
|---|---|---|---|
| 7 | a… | Mark-off | milk |
| 6 | b… | Delete | bread |
| 5 | c… | Add | eggs |
| 4 | Recolour List | Yellow | |
| 3 | Rename List | Weekly Shopping | |
| 2 | b… | Add | bread |
| 1 | a… | Add | milk |
In eight steps, we can see how these seven JournalEntry records are applied to a blank list to recreate the full shopping list:

Once a JournalEntry has been added to iCloud, it will never be modified — it is a read-only log of changes. The only way JournalEntry records are ever removed is when the app compresses the list, which will happen regularly to prevent the list becoming large and causing performance issues. List compression will be discussed in detail in part 7.
Every newly created JournalEntry record must be synchronised between each device and iCloud.
How does Synchronisation Work?
In Part 3, we looked at how data in iCloud can be changed using CKModifyRecordsOperation.
We also looked at three ways data can be read from iCloud:
- CKFetchRecordsOperation
- CKQueryOperation
- CKFetchDatabaseChangesOperation with CKFetchRecordZoneChangesOperation
These operations form the basis of synchronisation. Now let’s look at the full cycle and how each device knows when a change has been made.
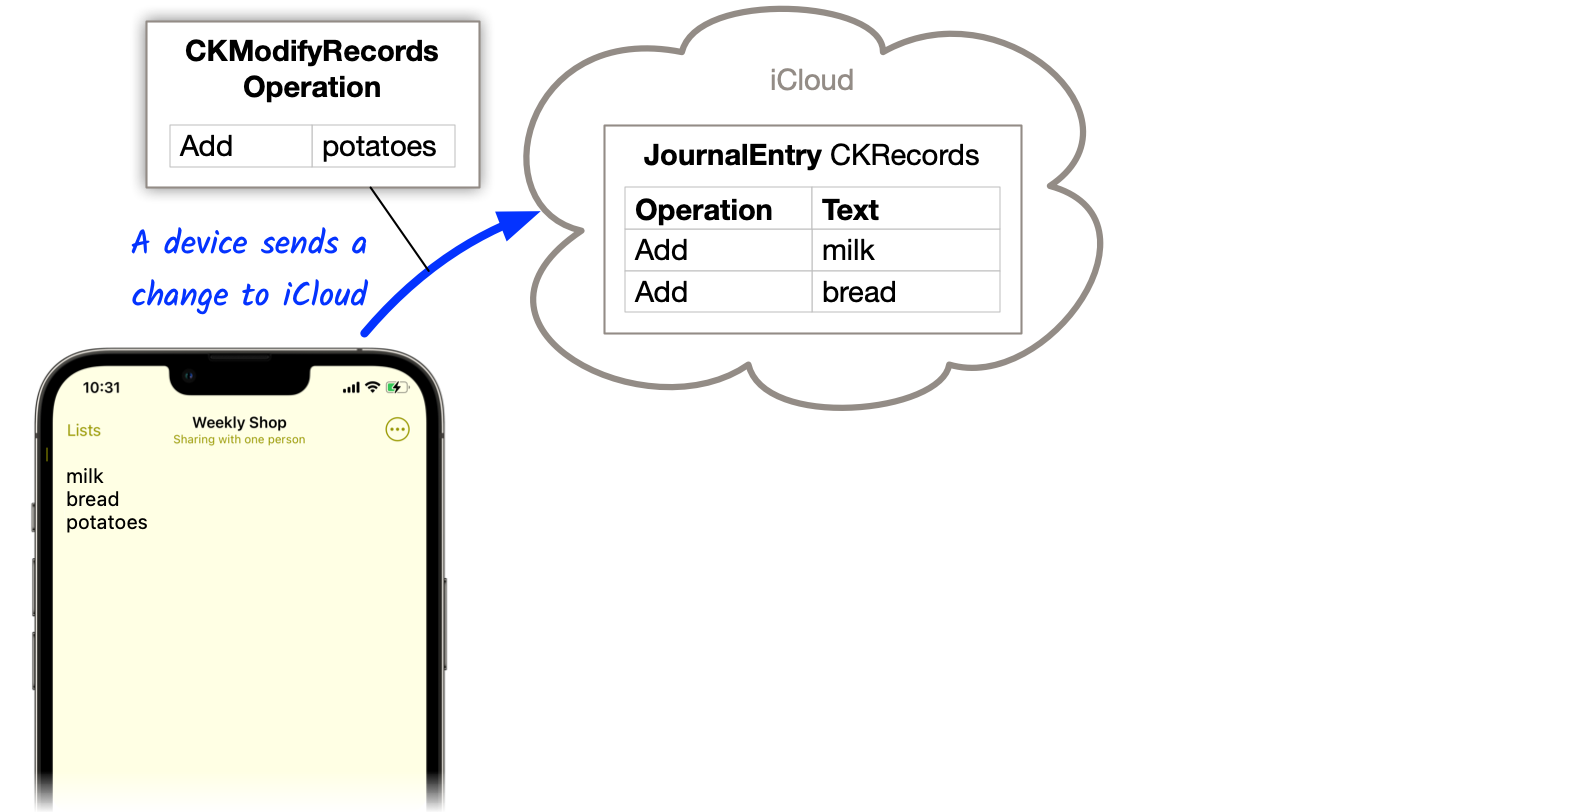
Sync Step 1: Upload Changes
When a change is made to a list on one device, a record representing that change must be uploaded to iCloud as soon as possible.
The device that made the change will send a CKModifyRecordsOperation request to iCloud using CloudKit:
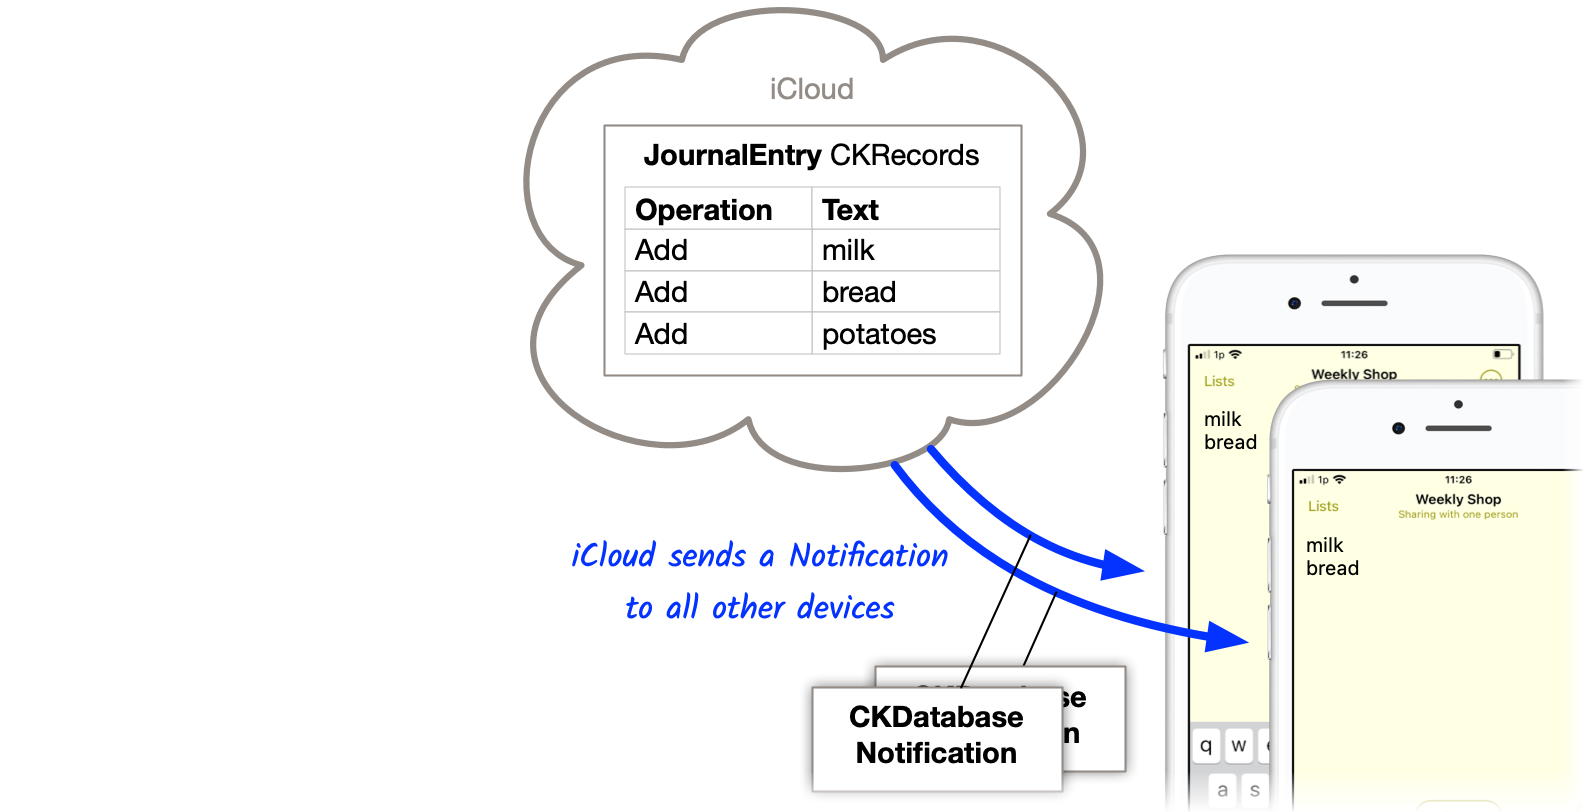
Sync Step 2: Notify other devices
After CloudKit has updated the iCloud database with the new entry, it sends a CKDatabaseNotification message to all other devices running the app.
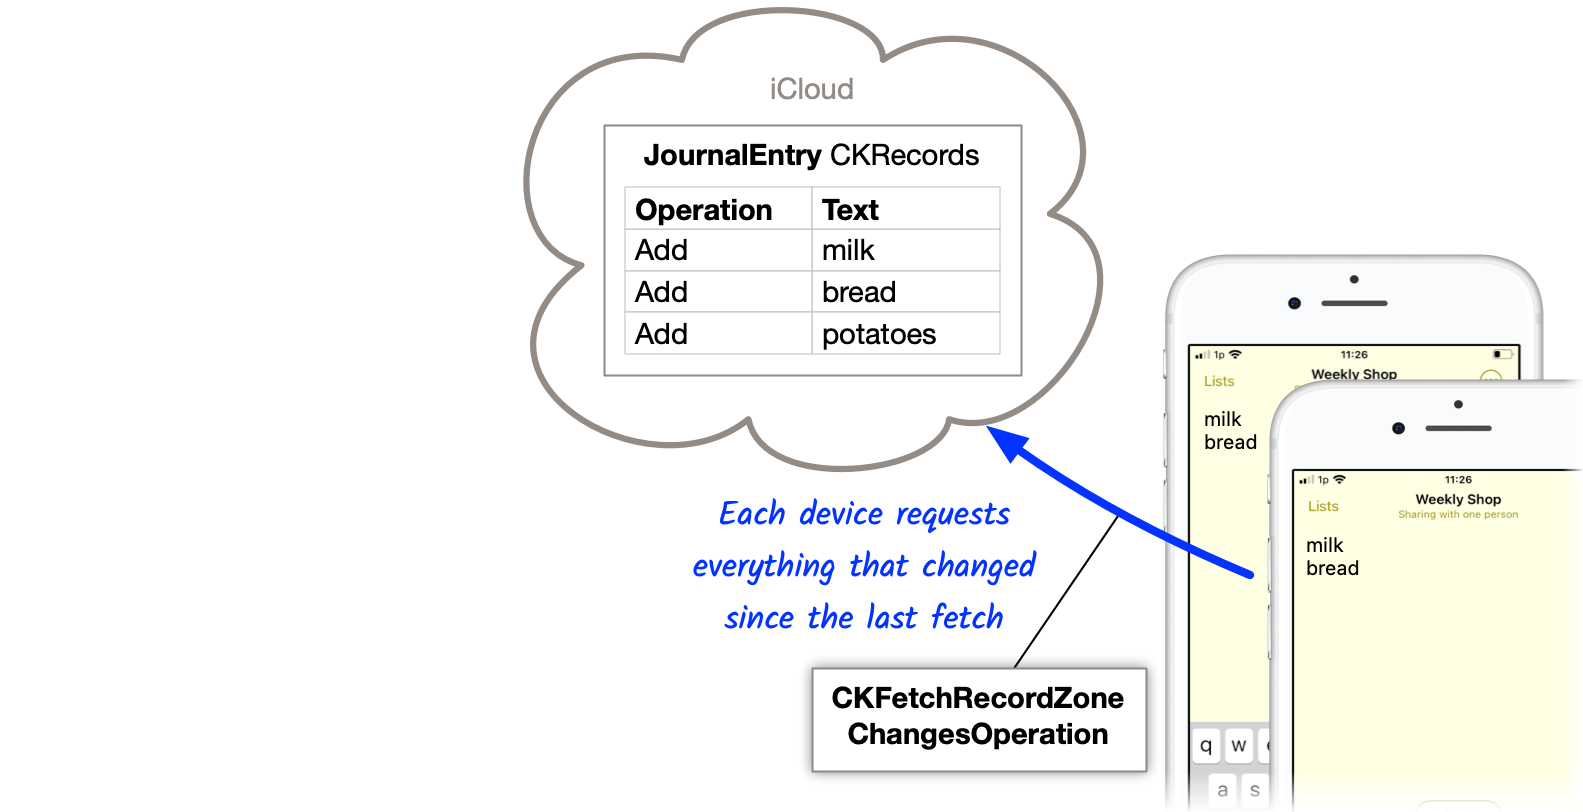
Sync Step 3: Other device requests change
Upon receipt of the notification, the other device will issue a
CKFetchDatabaseChangesOperation
followed by a
CKFetchRecordZoneChangesOperation
to request a list of all changes.
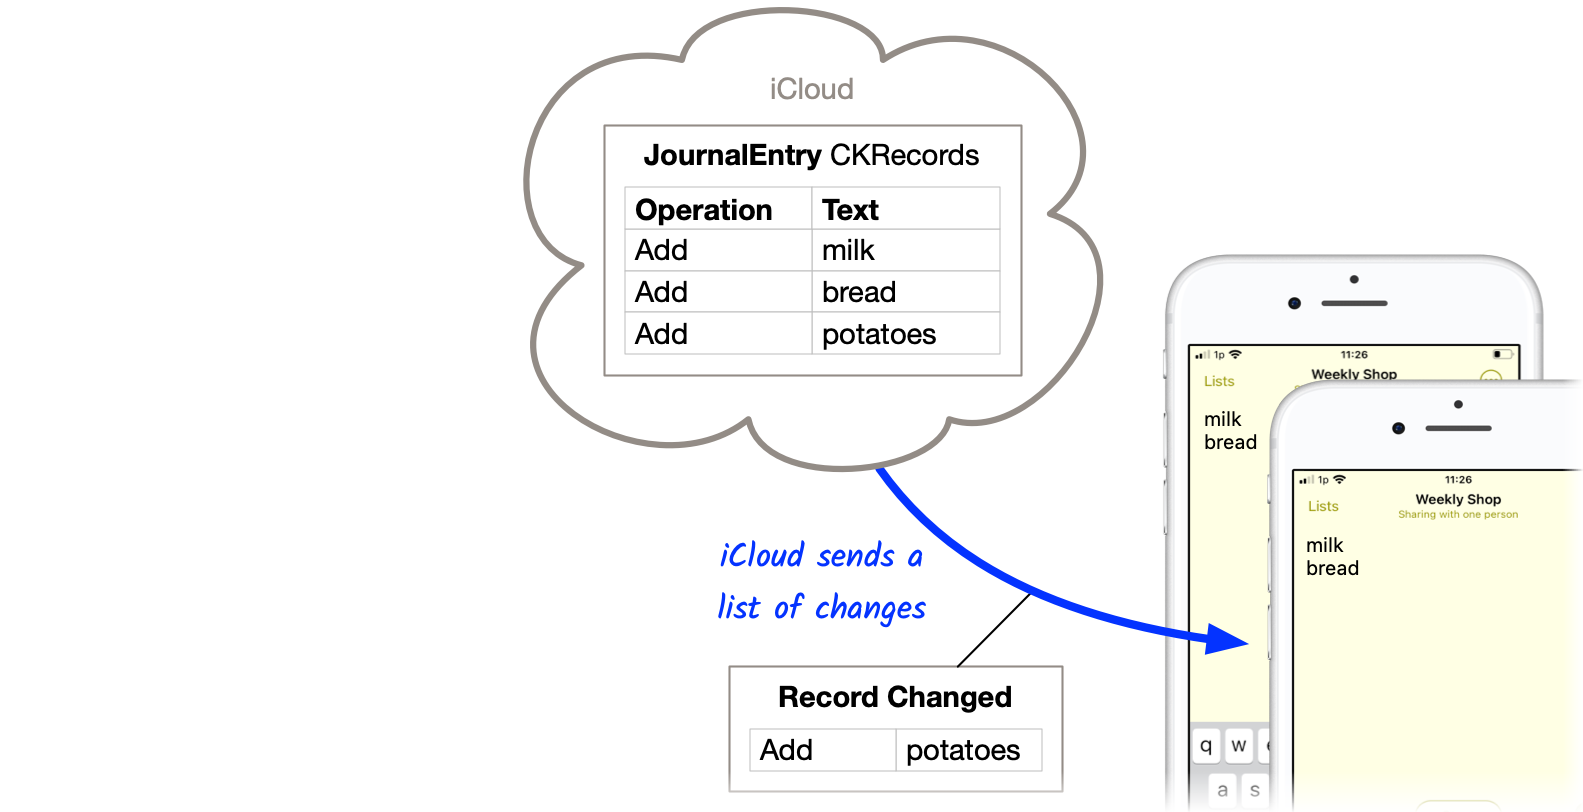
Sync Step 4: iCloud sends changes
iCloud sends a list of changes made since the last request. This list will include the newly created “Add potatoes” record:
How does iCloud know which devices to notify?
Shopping UK uses CloudKit Subscriptions to inform the app when another user makes a change to a shared list.
After the app has registered a subscription with CloudKit, the app will be notified when the watched data changes.
How are subscriptions registered?
Subscriptions are managed separately for each user. They are not global — they live in the user’s iCloud account.
There are three types of subscription:
Shopping UK uses CKDatabaseSubscription, which is used to watch changes in a specific CKDatabase and it can be further limited to specific Record Types.
During app start up (willFinishLaunchingWithOptions), Shopping UK will attempt to register four subscriptions, one for each Record Type (cloudkit.share and JournalEntry) and one for each CKDatabase (Private and Shared)
CKModifySubscriptionsOperation is used to register the four subscriptions:
- PrivateJournalEntryChanges
- Privatecloudkit.shareChanges
- SharedJournalEntryChanges
- Sharedcloudkit.shareChanges
Receiving notifications from subscriptions?
Once a subscription has been registered, iOS will call the AppDelegate’s didReceiveRemoteNotification method to tell the app when a change happens.
This notification can be received while the app is active, in the background or even when it is not running. (source)
the system calls this method when your app is running in the foreground or background. In addition, if you enabled the remote notifications background mode, the system launches your app (or wakes it from the suspended state) and puts it in the background state when a remote notification arrives
The basics:
- Call the completion handler after processing the notification.
- Return the appropriate result:
NewData,NoDataorFailed. Be consistent with how you use these. - You only have 30 seconds to process the notification. Be as quick and energy efficient as possible.
Important: A notification will not always be received
A notification is not guaranteed to be sent from iCloud. iOS uses heuristics for deciding when to send a notification.
Apple doesn’t document the heuristics. Presumably because it doesn’t want developers to game the system. The best official document I found was Apple TechNote TN2265 from 2016:
your app will receive the notification if iOS or OS X determines it is energy-efficient to do so. If the energy or data budget for the device has been exceeded, your app will not receive any more notifications with the content-available key until the budget has been reset. This occurs once a day and cannot be changed by user or developer action.
iOS tracks how long your app takes to process each notification and what result was returned by your app.
Example:
| Notification | Time Taken (ms) | Result |
|---|---|---|
| 1 | 2000 | newdata |
| 2 | 3000 | newdata |
| 3 | 100 | nodata |
| 4 | 5000 | newdata |
| 5 | 7000 | failed |
| 6 | 600 | newdata |
| 7 | 100 | failed |
| 8 | 2500 | newdata |
| 9 | 3500 | newdata |
| 10 | 20 | nodata |
iOS uses this data to decide how to handle the next notification. Should it be sent to the app at all? And, if judged worthy, how soon should it be sent?
My guess, based on a lot of testing, is iOS groups these results by type, then calculates stats on each group:
- Median time for
newdatawas 2750ms - Median time for
nodatawas 60ms
iOS appears to use this information, and other data (battery charge, battery decrease rate, number of notifications received) to decide how much budget to give your app for future notifications.
While testing, I learnt a couple of important lessons.
Lesson 1: Always return a result
I found a bug in my app, which meant a result was not returned when the app was in the background. When this happened, CloudKit would refuse to send notifications for a few minutes. My app wasn’t playing by the rules so it was being punished.
Lesson 2: Classify results correctly
Another bug meant my app would sometimes return nodata instead of newdata, despite actually fetching and processing genuine data.
This would happen about 50% of the time.
I’d add an item to a list on one device but the notification wouldn’t appear on the second device.
I’d add a second item and this time a notification would be received on the second device.
Because the app was incorrectly reporting work as nodata, iOS reduced the number of notifications it sent by half.
From iOS’s perspective this made sense — why waste resources on notifications that take the same time to process
but don’t produce useful work.
It’s all about saving battery. If an app abuses the time given to process remote notifications, iOS will grant it less time in the future. If the app fails to respond at all, iOS will penalise the app. If the app says it hasn’t done anything useful with the time it was given, iOS will grant it less time in future. This can result in notifications being skipped, combined or delayed.
The best strategy is to be efficient with resources — don’t do more than you need to when a notification arrives — and be
truthful with what you did. If your app used its time to fetch new data, return newdata. If your app didn’t need to do anything, return nodata.
And if your app could not complete processing for whatever reason, return failed. This will allow iOS to classify the time taken in the
correct dataset so it can draw the correct conclusions.
One final tip, when testing, if your notifications arrive on some devices but not others, try:
- Charging the device. iOS will try harder to save battery when it is low, and skipping notifications is one way to do this.
- Disable “Do Not Disturb”. I saw a situation when this prevented notifications from arriving. As soon as I disabled “Do Not Disturb” notifications began to arrive again.
- Wait a while. iOS seems to reset its stats after a while. Try waiting a few minutes or even a few hours. Or try a different device.
How does the app respond to subscription notifications?
After receiving the notification, Shopping UK fetches the list of changes using CKFetchDatabaseChangesOperation and CKFetchRecordZoneChangesOperation as described in Step 3 above, and Part 3 of this series.
It may be tempting to skip the “fetch” step and use the information provided in the notification message, but this is unreliable. iOS may decide to combine or drop notifications for individual changes so an explicit fetch is required to ensure no changes are missed.
How is the list of changes processed?
After the app has made the request, CloudKit will send several responses, which may include:
- a set of CKRecords
- a list of deleted RecordZone.IDs,
- a list of deleted Record.IDs
See Part 3 for full details.
When the app receives changes, it stores them locally until it is the right time to apply them to the user interface.
The “right time” depends on which list is active, and on what the user is doing.
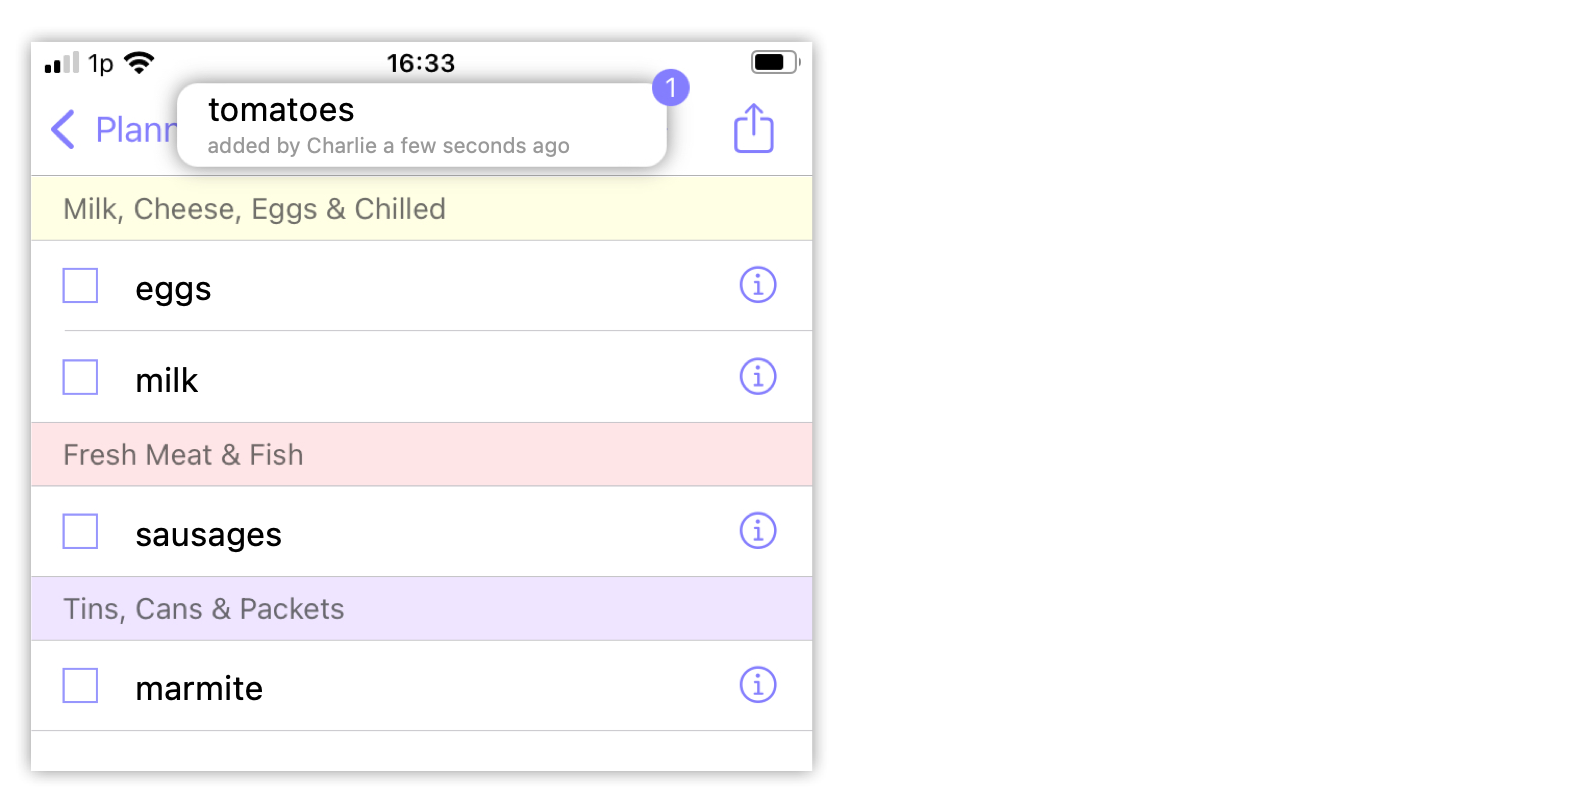
When the app is in the “Planning” screen, the JournalEntry operations can be applied to the current list straight away. But, if the app is in the “Shopping” screen, a different approach is needed. If items were added to the visible list immediately, it would disrupt the user’s flow (imagine if a set of new items were added to your list just as you were about to mark it off. It would be annoying to accidentally tap the wrong item because the app had decided to shuffle the list items around just at that moment).
To provide a better user experience, Shopping UK displays each “Add” as a visible notification at the top of the list. Then, when the user taps the notification, the queued items will move to the right category in the list.
When an item is “Marked-off” or “Deleted”, the app handles things differently. Since the item is already in the list, there is no need to display a separate notification. Instead, the item’s table cell is updated to reflect the state change.
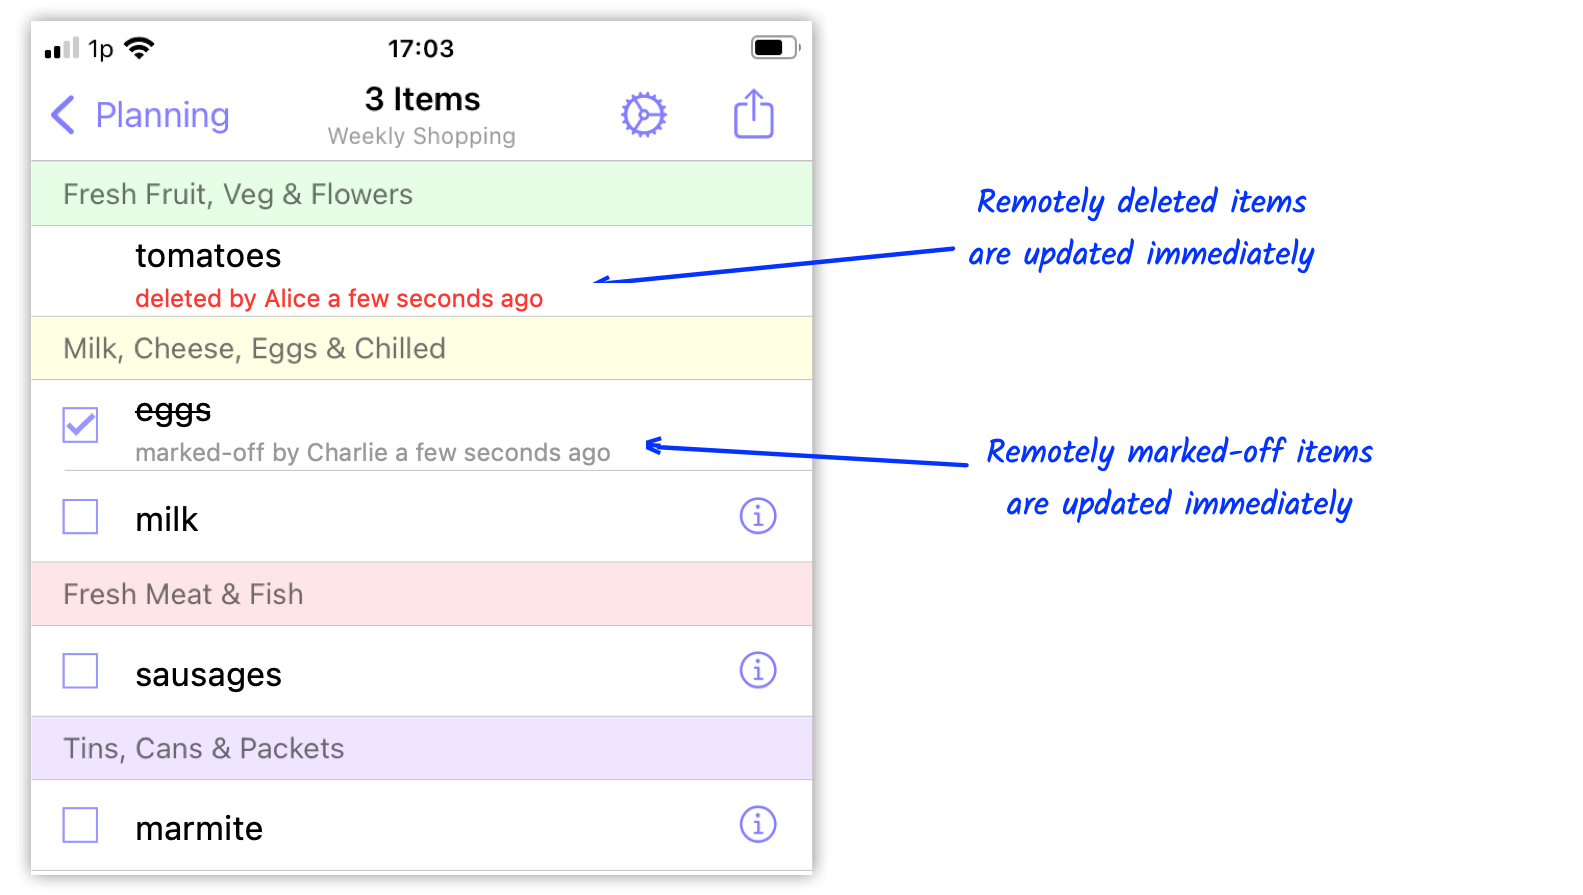
This behaviour makes it a delight to use Shopping UK when family and friends are shopping together. Some people like to split up in the supermarket to save time. To make this work, it is vital that changes appear quickly and are visually obvious, so the same item isn’t purchased twice.
When to synchronise?
Most of the time, synchronisation happens automatically. If a user makes a change to the list, a JournalEntry record representing the change will be immediately uploaded to iCloud. If a CKDatabaseNotification is received, which indicates someone else has made a change, the app will immediately fetch changes from iCloud.
In addition, the app will fetch when the app is launched (in case any changes were made by other participants while the app was in the background).
But this is not always enough.
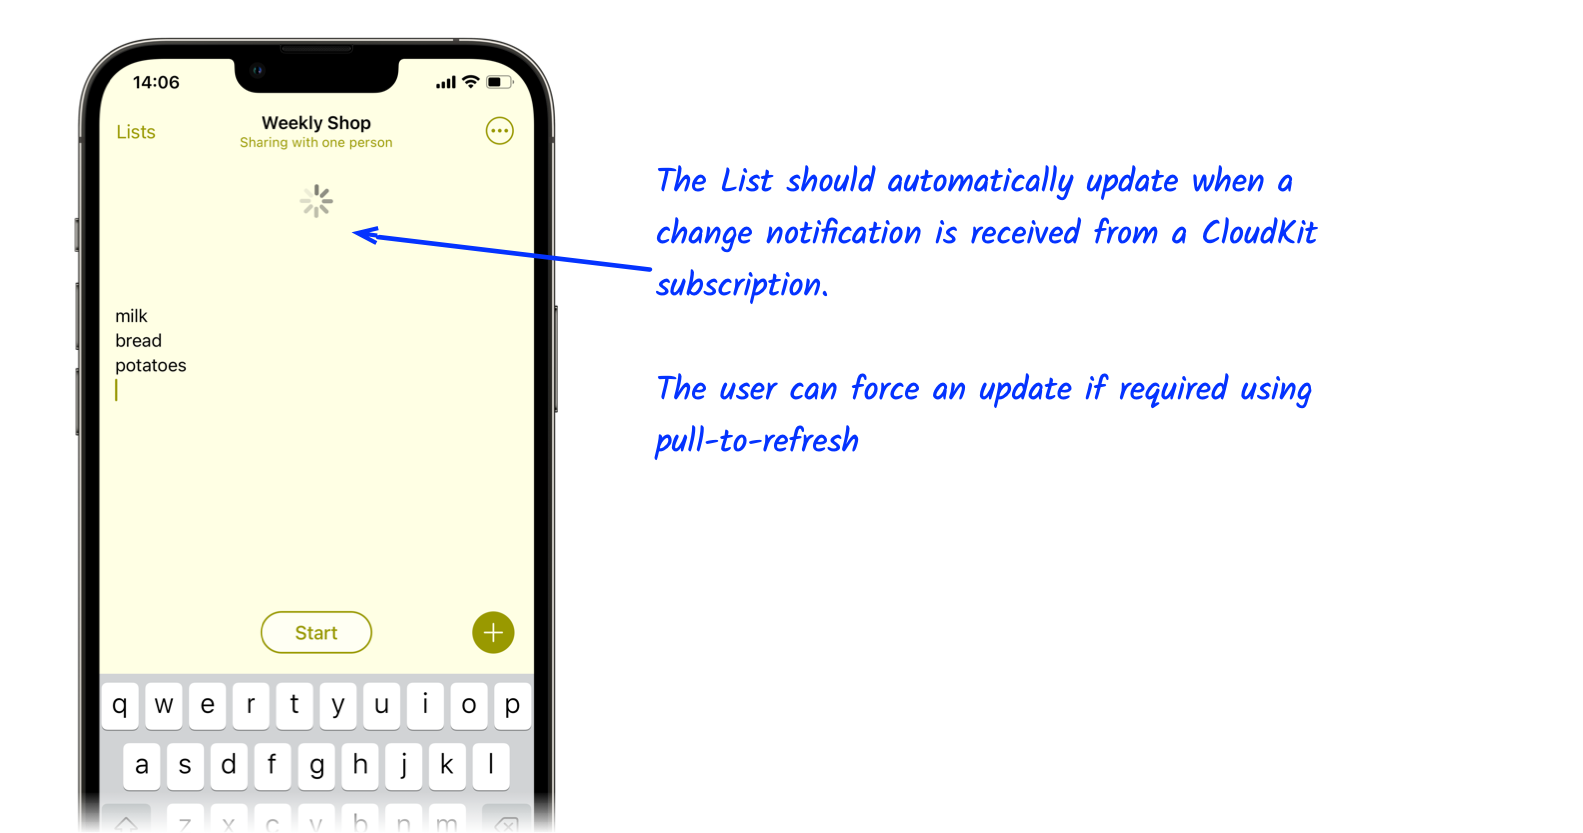
To handle unforeseen situations, such as CloudKit subscriptions not arriving on time, I also added a way to do invoke the full upload-and-fetch synchronisation process manually.
This can be triggered by pulling down on the “planning” screen (shown below) or the “shopping” screen (the one with checkboxes)
Another way to invoke manual sync is the “Synchronise Now” button on the Activity sheet:
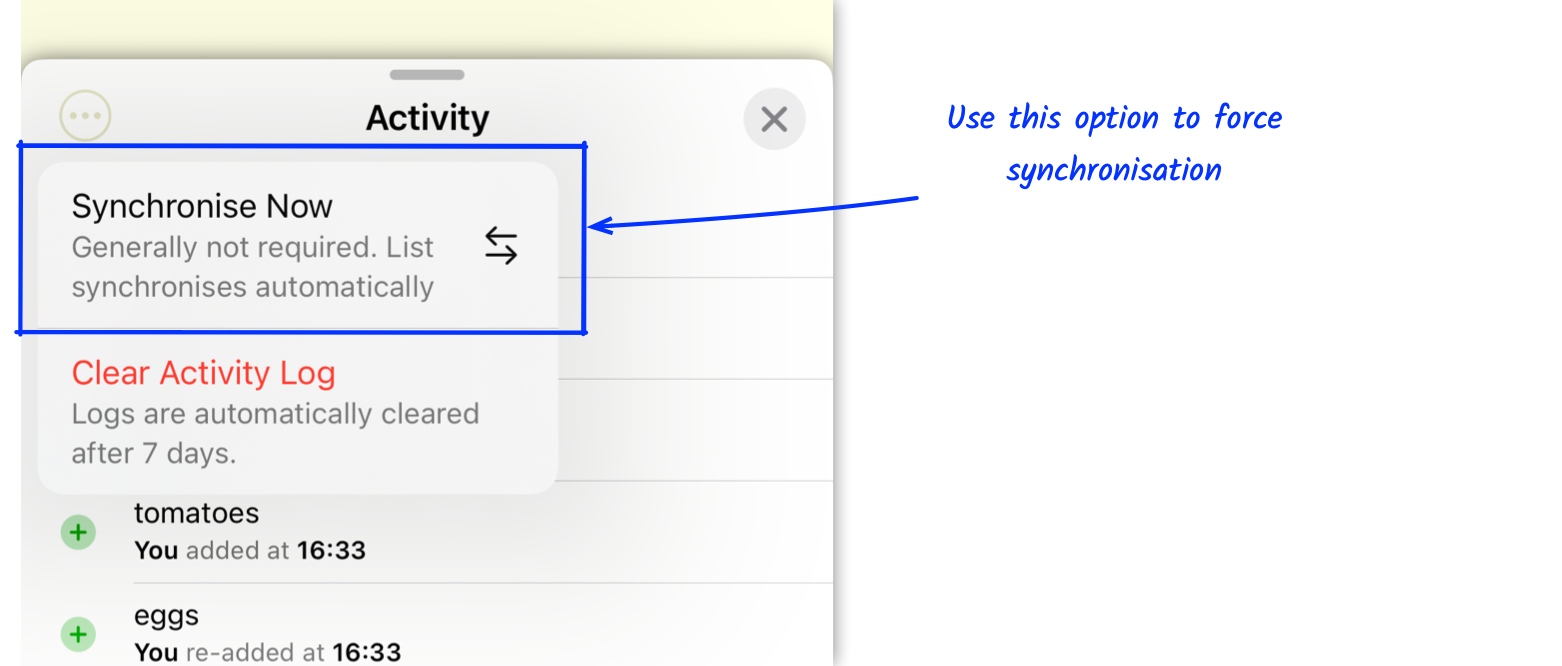
I don’t normally like adding multiple ways of doing the same thing — I’d rather ensure there is a single reliable way to accomplish something — but when there are a lot of moving parts, some of which out of my control (i.e. iCloud, database subscriptions, and the network), it is reassuring to know users have a manual alternative available if needed.
Next week, we’ll look at how a share is changed or stopped, what happens when a list is deleted, and background maintenance.
If you get a chance, please try Shopping UK and let me know what you think at @wheelies
